Table of contents
- Docker Installation on Windows 10
- Building Docker for node.js
- Building Docker for Flask
- How to Create Django Docker Images
- Docker file Overview
- Building Docker container for Python App
- CS501 Prisma Project Specific:
Docker Installation on Windows 10
| Note: The code listed here is based on this tutorial on YouTube, [WSL with Docker installation on windows 11 | Docker Desktop WSL backend](https://www.youtube.com/watch?v=BMBwyadxokc) |
Step 1: Follow this documents, Docker Desktop WSL 2 backend, get Docker Desktop Install and configured correctly:
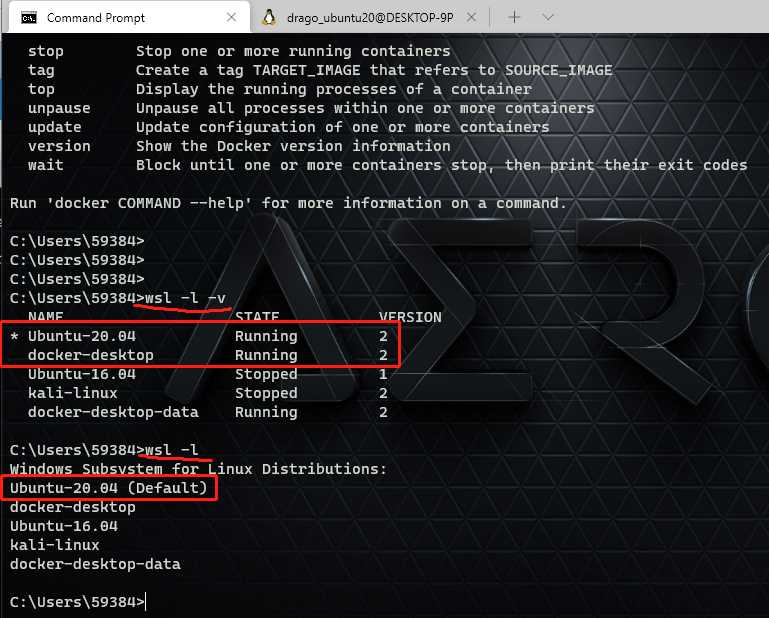
Step 2: Open PowerShell, and make sure you have the following result:
- WSL has updated to version 2
- The default wsl is the latest Ubuntu
- Ubuntu and docker-desktop are running
- Checking docker is installed

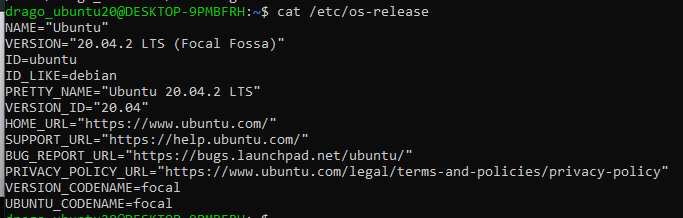
Step 3: Verify the Ubuntu Version
- Open Linux Ubuntu Terminal, and type with the following command:
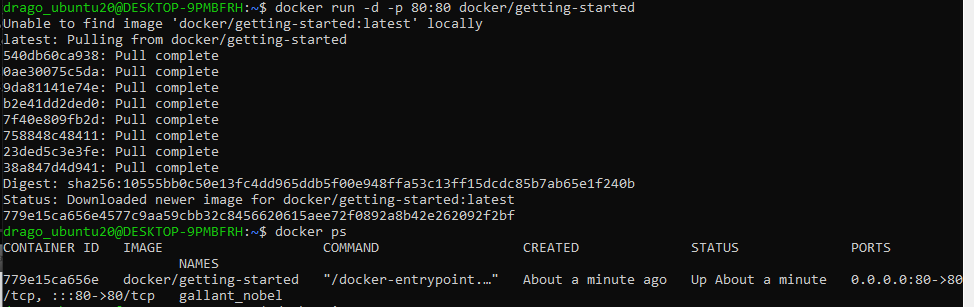
Step 4: Using Docker to run an toy app
docker run -d -p 80:80 docker/getting-started
# -d for detach, run container in background
# -p pushlish-list, publish a container's port(s) to the host
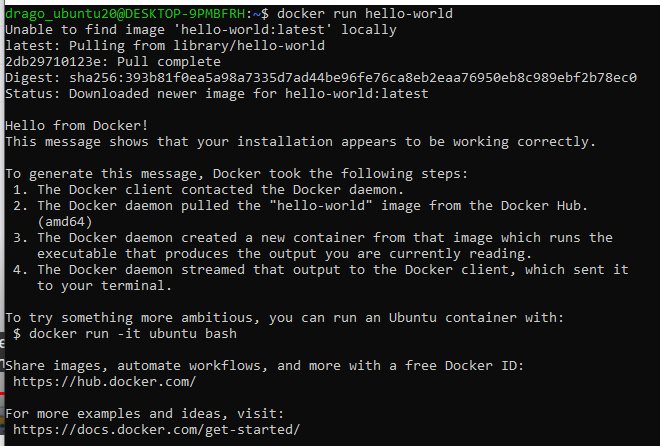
Let’s run the hello-world container
docker run hello-world
All code in one:
docker build -t getting-started .
docker run -d -p 80:80 docker/getting-started
docker run hello-world
docker run -it ubuntu bash
lsb_release -a //check docker ubuntu version
apt update 	//update package in docker ubuntu instance
apt install lsb-release 	// to install lsb-release in docker ubuntu instance
Building a Django app with docker
mkdir django-docer-demo 	// Create a folder
cd django-docer-demo		// move into directory
code .						// launch VS code
Dockerfile
create a file called Dockerfile, and add the following code
FROM python:3		# define the based image
ENV PYTHONUNBUFFERED 1	# Allowing you to see the real time logging output in a buffer
RUN mkdie /code			# Create a directory in container called /code
WORKDIR /code			# define it for working directory
ADD	requirements.txt /code/	# move add requirments.txt file to container
RUN pip install -r requirements.txt	# Install dependencies
ADD . /code/			#
Docker Compose
Docker compose command run on docker.compose.yml file, and it allows you to execute multiple command operations at once
version: '3'	# The latest format version

services:
	db:
		image: postgres
	web:
		build: .
		command: python3 manage.py runserver 0.0.0.0:8000
		volumes:
			- .:/code
		ports:
			- "8000:8000"
		depends_on:
			- db
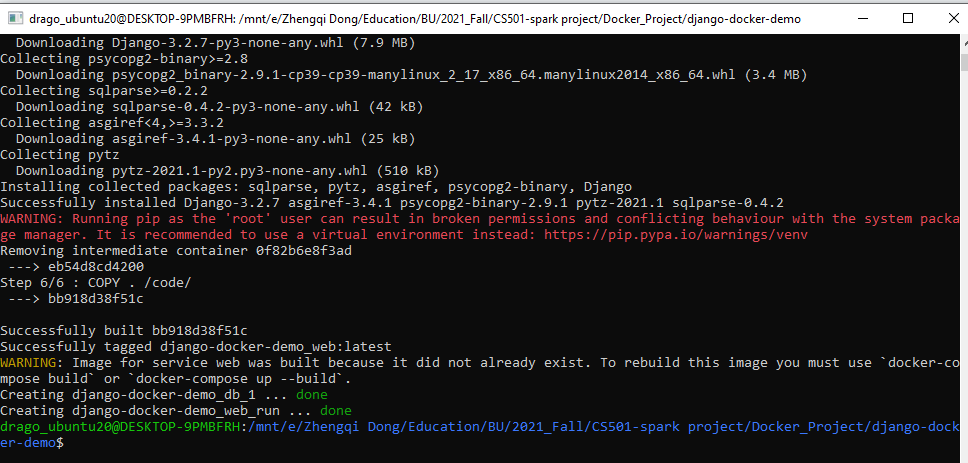
Open an Ubuntu 20 terminal, and type the following command:
sudo docker-compose run web django-admin startproject composeexample . # ==> An django application called "composeexample" will be created
ls -al
su chown -R $USER:$USER .	# ==> Change the file owner to user
ls -al
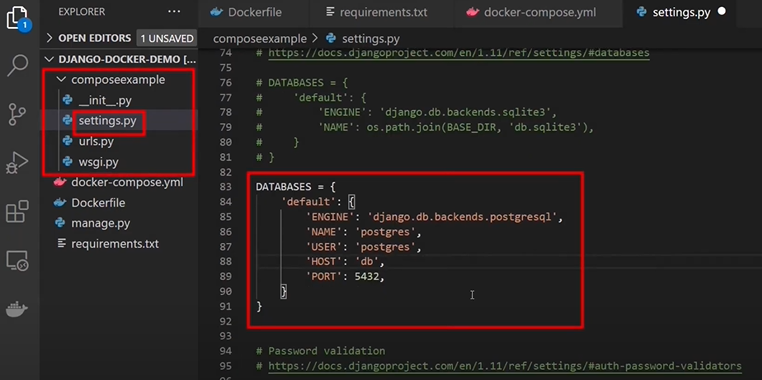
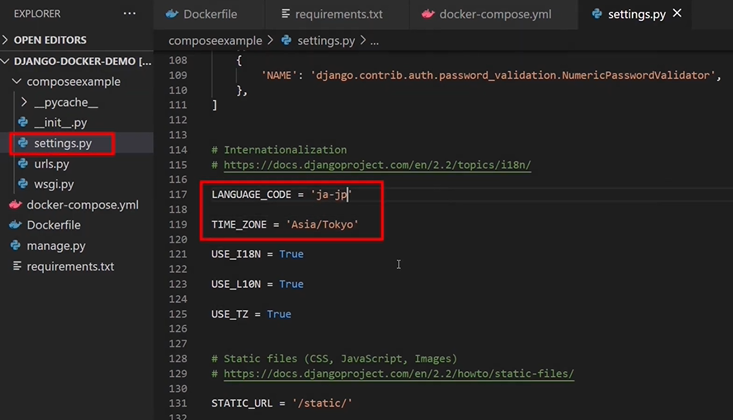
Open the settings.py file, and configure it as below:
Note: Now start the django server with docker with docker compose up.
docker-compose up
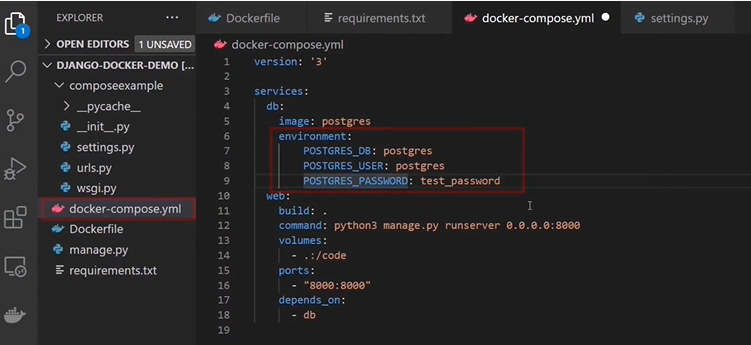
If you got db error, e..g, “Could not translate hosname ”db” to address: Name or service not known. ==> GO to docker-compose.yml file, and configure as below:
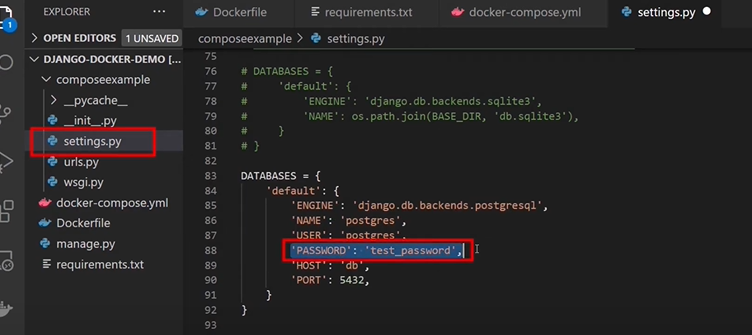
as well as the settings.py file:
Now, let’s launch the server again with docker compose, and you should be about to see it in localhost:8000
If you need to change the language, do it in settings.py as well:
How to stop the server:
docker-compose down
Reference:
- Using Docker in WSL2, https://code.visualstudio.com/blogs/2020/03/02/docker-in-wsl2
- Get started with Docker remote containers on WSL 2, https://docs.microsoft.com/en-us/windows/wsl/tutorials/wsl-containers
- Introduction to Docker containers
- Get started using Python for web development on Windows
- Docker Desktop WSL 2 backend
Building Docker for node.js
Dockerfile
FROM node:12.16.3
WORKDIR /code
ENV PORT 80
COPY package.json /code/package.json
RUN npm install
COPY . /code
CMD ["node", "src/server.js"]
With Explanation
FROM node:12.16.3	# Define the latest node base image, [name]:[tag]
WORKDIR /code		# Create /code as working directory
ENV PORT 80			# The env port will be expose in for image
COPY package.json /code/package.json	# package.json define all required package
RUN npm install		# npm is node package manager, and it will install all packages
COPY . /code		# Copy all the file in current dir to /code folder in docker image
CMD ["node", "src/server.js"]	# Start running your image as container
Terminal command:
docker build --help
docker build -t hello-world .	# . --> use the path of current directory
docker run hello-world
docker ps 			# only display the running images
docker ps -a		# display all images
docker stop image_name	# stop running
docker rm image_name
Building Docker for Flask
Dockerfile
# syntax=docker/dockerfile:1
FROM python:3
ENV PYTHONUNBUFFERED=1
WORKDIR /code
COPY requirements.txt /code/
RUN pip install -r requirements.txt
COPY . /code/
docker-compose.yml
version: "3.9"

services:
  db:
    image: postgres
    volumes:
      - ./data/db:/var/lib/postgresql/data
    environment:
      - POSTGRES_DB=postgres
      - POSTGRES_USER=postgres
      - POSTGRES_PASSWORD=postgres
  web:
    build: .
    command: python manage.py runserver 0.0.0.0:8000
    volumes:
      - .:/code
    ports:
      - "8000:8000"
    depends_on:
      - db
settings.py
DATABASES = {
    'default': {
        'ENGINE': 'django.db.backends.postgresql',
        'NAME': 'postgres',
        'USER': 'postgres',
        'PASSWORD': 'postgres',
        'HOST': 'db',
        'PORT': 5432,
    }
}
How to Create Django Docker Images
January 22, 2021
Docker is a containerization platform that makes it possible to build, ship, and run distributed applications in controlled environments with defined rules.
Prerequisites
- Have Python 3.6 or newer installed on your computer.
- Get Python package manager, pip installed on your computer.
- You will need Docker installed on your computer.
For Docker installation, setup, and a quick start, visit Getting started with Docker.
Project setup
We will be creating a Docker image for the Todo application that we created in this tutorial. The Todo application that allows us to create, read, update, and delete Todo items via a REST API.
Ensure virtualenv is installed on your computer by executing the command below.
$ virtualenv --version
virtualenv 20.2.2 from /home/username/.local/lib/python3.8/site-packages/virtualenv/__init__.py
If you get an error executing the command above, run the command below to install virtualenv on your computer.
$ pip install virtualenv
Create a working directory for the project by executing the command below.
$ mkdir todo
$ cd todo
Create a virtual environment for our project using the virtualenv module that we just installed. Execute the command below to create and activate the virtual environment.
$ virtualenv venv
$ source venv/bin/activate
In the working directory, clone the project from Github to your computer using the command below.
$ git clone https://github.com/paulodhiambo/django_todo.git
Move into the project directory by executing the command below.
$ cd django_todo
Execute the command below to install all the required dependencies for the project to run.
$ pip install -r requirements.txt
Run the application to verify that nothing is broken and the application runs without errors.
$ ./manage.py runserver
Below is the project structure.
└── django_todo         # < project root package
    ├── todo             # < todo app
    │   ├── admin.py
    │   ├── apps.py
    │   ├── migrations
    │   ├── models.py
    │   ├── serializers.py
    │   ├── urls.py
    │   └── views.py
    ├── manage.py
    ├── requirements.txt    # < Django dependencies list
    └── django_todo
        ├── settings.py # Django settings file
        ├── urls.py
        └── wsgi.py
Creating a Dockerfile
A Dockerfile is a text file that contains instructions on how the Docker image will be built. A Dockerfile contains the directives below.
- FROM: directive sets the base image from which the Docker container will be built.
- WORKDIR: directive sets the working directory in the image created.
- RUN: directive executes commands in the container.
- COPY: directive copies files from the file system into the container.
- CMD: directive sets the executable commands within the container.
In the root project directory, create a file with the name Dockerfile with no file extension. In the Dockerfile created above, add the code below.
# pull the official base image
FROM python:3.8.3-alpine

# set work directory
WORKDIR /usr/src/app

# set environment variables
ENV PYTHONDONTWRITEBYTECODE 1
ENV PYTHONUNBUFFERED 1

# install dependencies
RUN pip install --upgrade pip
COPY ./requirements.txt /usr/src/app
RUN pip install -r requirements.txt

# copy project
COPY . /usr/src/app

EXPOSE 8000

CMD ["python", "manage.py", "runserver", "0.0.0.0:8000"]
FROM python:3.8.3-alpinesets the base image from which the Docker container will be created.WORKDIR /usr/src/appsets the working directory inside the container to/usr/src/app.ENV PYTHONDONTWRITEBYTECODE 1prevents Python from copying pyc files to the container.ENV PYTHONUNBUFFERED 1ensures that Python output is logged to the terminal, making it possible to monitor Django logs in realtime.RUN pip install --upgrade pipinstalls and upgrades the pip version that is in the container.COPY ./requirements.txt /usr/src/appcopies therequirements.txtfile into the work directory in the container.RUN pip install -r requirements.txtinstalls all the required modules for thedjango_todoapplication to run in the container.COPY . /usr/src/appcopies all the project source code to the working directory in the container.EXPOSE 8000exposes port 8000 for access from other applications.CMD ["python", "manage.py", "runserver", "0.0.0.0:8000"]sets the executable commands in the container.
Building the Docker image
To build the Docker image from the Dockerfile we created above, execute the command below.
$ docker build --tag django_todo:latest .
--tagsets the tag for the image. For example, we are creating a Docker image frompython:3.8.3that has the tagalpine. In our Docker image,latestis the tag set.- The trailing
.indicates that theDockerfileis within the current working directory.
To list all the available images on your computer, execute the command below.
$ docker image ls
REPOSITORY    TAG            IMAGE ID       CREATED         SIZE
django_todo   latest         6e06c89267f1   3 hours ago     147MB
todo          latest         b10c177c6d58   4 hours ago     162MB
<none>        <none>         2f418d359923   4 hours ago     162MB
centos        latest         300e315adb2f   3 weeks ago     209MB
python        3.8.3-alpine   8ecf5a48c789   6 months ago    78.9MB
hello-world   latest         bf756fb1ae65   12 months ago   13.3kB
From the above list, we see the django_todo image that we have created.
Creating and running the Docker Container
To build and run a Docker container from the Docker image we created above, run the command below.
$ docker run --name django_todo -d -p 8000:8000 django_todo:latest
--namesets the name of the Docker container.-dmakes the image run in detached mode. The image is capable of running in the background.-p 8000:8000maps port 8000 in the Docker container to port 8000 in localhost.django_todo: latestspecifies which image is used to build the Docker container.
To list all the running Docker containers, execute the command below.
$ docker container ps
CONTAINER ID   IMAGE                COMMAND                  CREATED       STATUS       PORTS                    NAMES
d73306a9fb04   django_todo:latest   "python manage.py ru…"   3 hours ago   Up 3 hours   0.0.0.0:8000->8000/tcp   django_todo
- On your browser visit
localhoston port 8000 to confirm if thedjango_todoapplication is running in the container.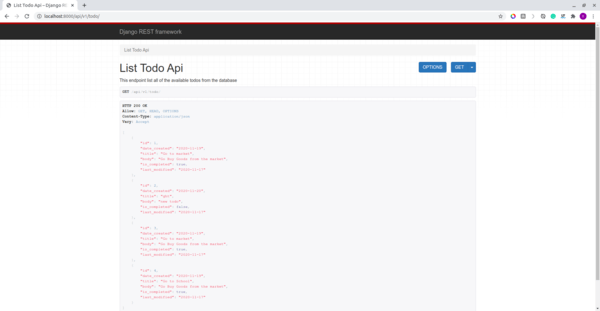
Publishing the Docker image to Docker Hub
Docker Hub is a repository of container images that can be used to create Docker containers.
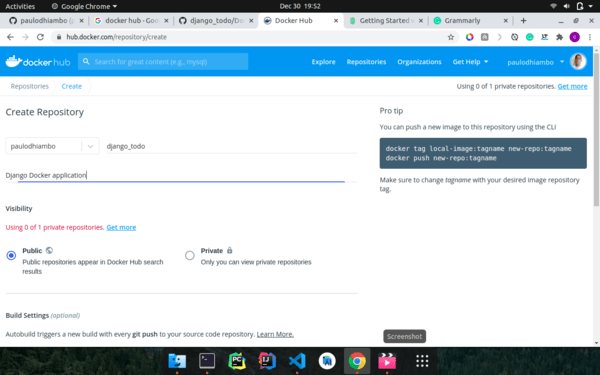
Visit Docker Hub and create an account if you don’t have one.
Once you have created an account and logged in to Docker Hub, create a repository with the name django_todo and the description Django Docker Image.
Now that we have created a repository in Docker Hub, to push the Docker image to the repository we have created we execute the command below.
$ docker login

$ docker tag django_todo:latest <Docker Hub username>/django_todo:latest

$ docker push <Docker Hub username>/django_todo:latest
docker logincommand logs you into your Docker Hub account on the command line, making it possible to push Docker images to Docker Hub.docker tag django_todo: latest <Docker Hub username>/django_todo: latestcommand modifies the tag of our local Docker image to include the Docker Hub username.docker push <Docker Hub username>/django_todo: latestpushes the image to Docker Hub repository we created earlier.
Note: Replace <Docker Hub username> with your actual Docker Hub username.
The full source code for the application is in this GitHub repository.
Conclusion
Docker is a great tool for packaging applications with the required dependencies to run them both locally and in production. Docker playground is an online playground that you can use to test various Docker commands without installing Docker locally on your computer.
Happy Coding!
Q&A
docker run -it --rm -v ${PWD}:/code -v /code/node_modules -p 8000:8000 front-end:dev
Reference
Docker file Overview
- FROM: directive sets the base image from which the Docker container will be built.
- WORKDIR: directive sets the working directory in the image created.
-
RUN: directive executes commands in the container.
RUNis a command that allows you to do any bash shell command you’d do normally. In our case, we just do some basic system updates and basic installs.
-
EXPOSE
EXPOSEallows your docker image to have aportor posts exposed to outside the image. This is important for web applications and software you want to receive requests.
- COPY: directive copies files from the file system into the container.
COPY: copy is another command we haven’t yet added to ourDockerfile. This will allow you to copy local files to your Docker image.
-
CMD: directive sets the executable commands within the container.
CMDthis is the final command your docker image will run. It’s typically reserved for something like running a web application.
Example for Django
# Create a virtual env with pipenv
mkdir simple_dj_docker
cd simple_dj_docker
sudo pip install pipenv
# python -m pip install pipenv
pipenv install django==3.1.1 gunicorn --python 3.8
# To activate this project's virtualenv, run pipenv shell.
pipenv shell
# Check the packages are installed
pip freeze
# Alternative you can use virtualenv
# virtualenv simpleenv
# source simpleenv/bin/activate
# OR more traditional way
# python -m venv venv
# echo venv/ >> .gitignore
# source venv/bin/activate

# Create Django Project
django-admin startproject cfehome .
# Run migration and create superuser
python manage.py makemigrations
python manage.py migrate
python manage.py createsuperuser
# To run the test case:
# python manage.py test

# Update Django settings.py
# DEBUG can be True/False or 1/0
DEBUG = int(os.environ.get('DEBUG', default=1))

# Create a `.env` file, and append 'DEBUG=1'
echo 'DEBUG=1' >> .env

# Test Gunicorn
gunicorn app_namge.wsgi:application
# Or you want to make it avaialble to the public as well
gunicorn app_namge.wsgi:application --bind 0.0.0.0:8000

# Create your Dockerfile
touch Dockerfile

Dockerfile
# syntax=docker/dockerfile:1
# pull the official base image (This is the defacto image. If you are unsure about what your needs are, you probably want to use this one. )
FROM python:3.8
# python:<version>-slim ==> This image does not contain the common packages contained in the default tag and only contains the minimal packages needed to run python.
# python:<version>-alpine ==> This image is based on the popular Alpine Linux project, available in the alpine official image. Alpine Linux is much smaller than most distribution base images (~5MB), and thus leads to much slimmer images in general.

# set environment variables
ENV PYTHONDONTWRITEBYTECODE 1
ENV PYTHONUNBUFFERED 1
ENV DEBUG=0

# install dependencies
WORKDIR /app

# Install Customized system dependencies
# install psycopg2 dependencies
# RUN apk update
# RUN apk add postgresql-dev musl-dev
# RUN apt-get install -qy python3-dev postgresql-dev build-essential
# RUN pip install pyzmq
RUN apt-get update && apt-get install -y --no-install-recommends \
        python3-setuptools \
        python3-pip \
        python3-dev \
        python3-venv \
        git \
        && \
    apt-get clean && \
    rm -rf /var/lib/apt/lists/*

# copy requirements.txt to /app/requirements.txt
COPY requirements.txt requirements.txt
RUN pip3 install --upgrade pip
# Install project dependencies to entire system with pipenv
# RUN pip3 install pipenv
# RUN pipenv install -r requirements.txt
# RUN pipenv shell
# RUN pipenv install django==3.1.1 gunicorn --python 3.8
# RUN pipenv install --skip-lock --system --dev
RUN pip3 install -r requirements.txt
# python -m venv venv
# echo venv/ >> .gitignore
# source venv/bin/activate
# RUN pip3 freeze

# copies all the project source code to the working directory in the container.
COPY . .

# Make 5000 as the default port to be exposed(so we can access the container from localhost, or even anywhere at internet)
EXPOSE 5000
ENV PORT 5000

# FOR Node.js use
# ENV PORT 80
# EXPOSE 80
# COPY package.json /code/package.json
# RUN npm install

# sets the executable commands in the container.
CMD ["python3", "chatbot/manage.py", "runserver", "0.0.0.0:5000"]
# CMD gunicorn app_name.wsgi:application --bind 0.0.0.0:5000
# CMD ["npm", "start"]
# CMD ["python3", "-m", "flask", "run", "--host=0.0.0.0"]

# Build a image and Run a container
# docker build -t hello_world_app .
# docker run -it -p 5000:5000 hello_world_app
# 8888 is default for Jupyter Notebook
# 5000 is default for Nodejs

## Extra command
# lsb_release -a
# wsl -l -v

# Publishing the Docker image to Docker Hub
# docker login
# docker tag django_todo:latest <Docker Hub username>/django_todo:latest
# docker push <Docker Hub username>/django_todo:latest

# Reference:
# Section: https://www.section.io/engineering-education/django-docker/
# Semaphore Dockerizing a Python Django Web Application: https://semaphoreci.com/community/tutorials/dockerizing-a-python-django-web-application
# Basic Usage of Pipenv: https://pipenv-fork.readthedocs.io/en/latest/basics.html
# Django on Docker Tutorial - A Simple Introduction, https://www.youtube.com/watch?v=KaSJMDo-aPs
Example of Prisma Backend deployment with Docker
Here is an example of docker file that I used for CS501 project backend:
Dockerfile
FROM node:16.8.0
WORKDIR /code

COPY . .

# add `/app/node_modules/.bin` to $PATH
ENV PATH ./node_modules/.bin:$PATH
# ENV PATH="./node_modules/.bin:$PATH"

ENV PORT 5000
EXPOSE 5000

# install app dependencies
COPY package.json package.json
COPY package-lock.json package-lock.json
# RUN apt-get update    # ==> not a good idea to run in container
# RUN apt-get install libssl1.1 libssl-dev  # ==> Those package doesn't exist in 16.8.0-slim. Slim version took out the openssl-y package to compress the size to make it smaller, but out backend required it to build container successfully
# RUN apt-get install openssl-y

RUN npm ci --production
RUN npm install

# RUN npm run build

# start app
CMD ["bash", "./launch.sh"]

# docker build -t sample:dev .
# docker run -it -p 3000:3000 simple-react-app
# $ docker run -it --rm -v ${PWD}:/app -v /app/node_modules -p 3001:3000 -e CHOKIDAR_USEPOLLING=true sample:dev


# Reference:
# Dockerizing a React App, https://mherman.org/blog/dockerizing-a-react-app/
# Heroku + Docker with Secure React in 10 Minutes, https://developer.okta.com/blog/2020/06/24/heroku-docker-react
You need a launch.sh file because there is some database setup we need to go through before running the backend aplication.
launch.sh
#!/bin/bash

npx prisma migrate dev --name init
npx prisma generate
# RUN npx prisma introspect
npx ts-node ./src/scripts.ts

npm start
docker-compose.yml
version: '3'
services:
backend:
container_name: backend-dev
image: prismagraphql/prisma:1.34
build: ./backend
# When the value supplied is a relative path, it is interpreted as relative to the location of the Compose file. This directory is also the build context that is sent to the Docker daemon.
# context: ./backend
# dockerfile: ./Dockerfiles
ports:
- '5000:5000'
depends_on:
- postgres
# env_file:
# - ./backend/.env
# [named volumes](https://docs.docker.com/compose/compose-file/#volumes) that are mounted and can be shared amongst your Docker containers (but not your host computer), for storing persistent data
# volumes:
# - .:/code
environment:
PRISMA_CONFIG: |
port: 5000
managementApiSecret: 6LeX8LMcAAAAANzYvwbZl34R0wh4LfB027rpMFJh
databases:
default:
connector: postgresql
host: localhost
port: 5432
user: postgres
password: postgresql
# allows processes to terminate quickly when you halt them with Control-C
init: true
restart: always
postgres:
image: postgres:13
container_name: postgres
restart: 'always'
expose:
- '5432'
ports:
- 5432:5432
# env_file:
# - .env
environment:
- POSTGRES_DB=test # Database name
- POSTGRES_HOST_AUTH_METHOD=trust # Trust anyone connect to database, so no authentication as password, easy the development
- POSTGRES_USER=postgres
- POSTGRES_PASSWORD=postgresql
volumes: # volumes help us persist the data between the restart and container, so when we restart the container, the data will be kept in db/data and specified path
- postgres:/var/lib/postgresql/data
# frontend:
# image: node:16.8.0-slim
# build:
# context: ./frontend
# dockerfile: ./Dockerfile
# ports:
# - '8000:8000'
# env_file:
# - ./frontend/.env.development
# volumes:
# - ./frontend:/opt/frontend
# restart: always
# init: true
# postgres-db:
# image: postgres:10.3
# restart: always
# environment:
# POSTGRES_USER: "postgres"
# POSTGRES_PASSWORD: "postgres"
# volumes:
# - postgres:/var/lib/postgresql/data
# init: true
volumes:
postgres: ~
# Reference: 1) Run postgres database in docker container, https://egghead.io/lessons/egghead-run-postgres-database-in-docker-container
Error 1:
The backend cannot connect to your database. (Note: listening on IPv3 address ‘0.0.0.0’ means the database is open to all in-bound request, can receive request anywhere in the internet. ) The problem here is the configuration of your backend application is not set up correctly, so it cannot find the correct address of database to communicate with.
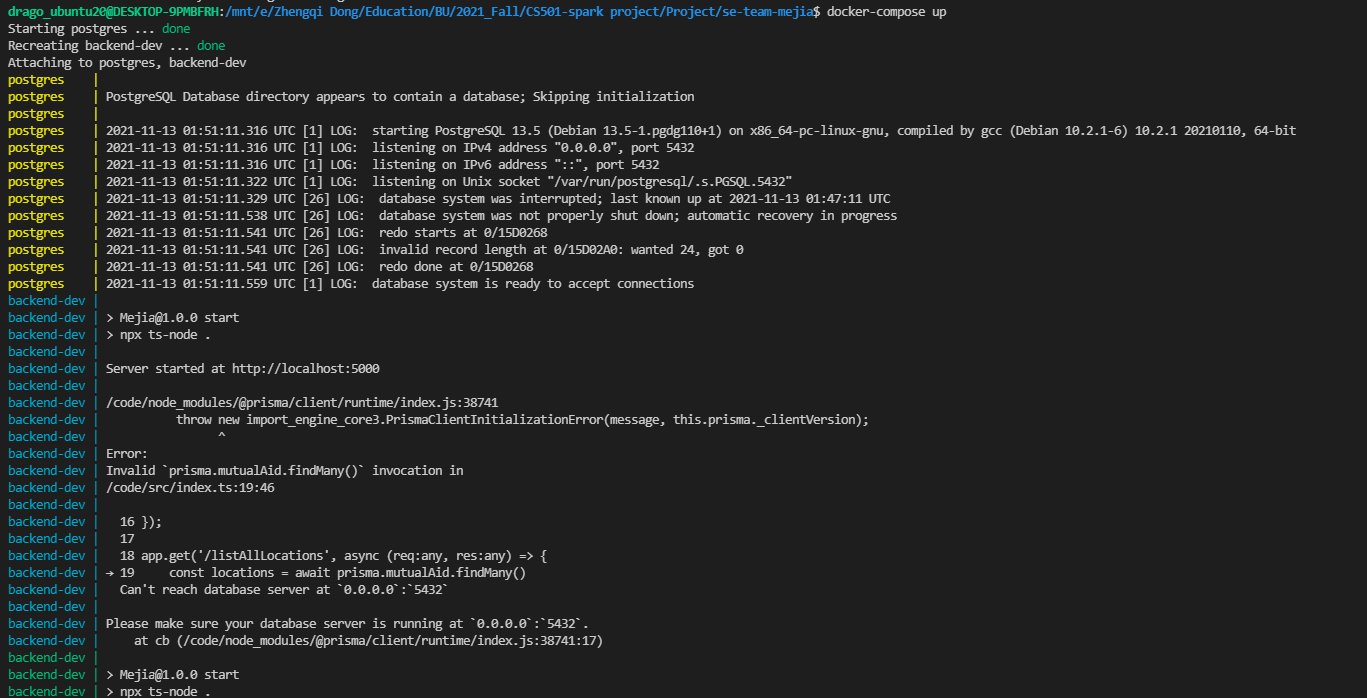
Solution to that is configure your DATABASE_URL at your Prisma backend application, to match the configuration that you defined for the database, as an example shown below:

Reference:
1) https://www.section.io/engineering-education/django-docker/ 2) Dockerizing a React App, https://mherman.org/blog/dockerizing-a-react-app/ 3) FROM python:version meaning, https://hub.docker.com/_/python 4) Awesome Docker, https://github.com/veggiemonk/awesome-docker 5) Run postgres database in docker container, https://egghead.io/lessons/egghead-run-postgres-database-in-docker-container
Building Docker container for Python App
Build Images
Simple Application
Let’s create a simple Python application using the Flask framework that we’ll use as our example. Create a directory in your local machine named python-docker and follow the steps below to create a simple web server.
 cd /path/to/python-docker
 pip3 install Flask
 pip3 freeze > requirements.txt
 touch app.py
Now, let’s add some code to handle simple web requests. Open this working directory in your favorite IDE and enter the following code into the app.py file.
from flask import Flask
app = Flask(__name__)

@app.route('/')
def hello_world():
    return 'Hello, Docker!'
Let’s start our application and make sure it’s running properly. Open your terminal and navigate to the working directory you created.
$ python3 -m flask run
Create a Dockerfile
The default filename to use for a Dockerfile is Dockerfile (without a file- extension). Using the default name allows you to run the docker build command without having to specify additional command flags.
# syntax=docker/dockerfile:1    # Optional, but it instructs the Docker builder what docker syntax to use, here points to the latest release of version 1
# Define the base image we would like to use for our application.
FROM python:3.8-slim-buster
# Instructs Docker to use this path as the default working direction for all subsequent command.
WORKDIR /app
# Copy requirement file into new image ($ COPY src_dir target_dir). Here we copy it into /app/requirements.txt, but since we already define the working direction, so no need to specify again
COPY requirements.txt requirements.txt
# use the RUN command to execute the command pip3 install
RUN pip3 install -r requirements.txt
# Add our source code into the image: this takes all the files located in the current directory and copies them into the WORKDIR of docker image
COPY . .
# Expose the host's port 5000 for the application running in container, so the application can map its port to host port, so you can use "localhost:5000" to check the app.
# Alternatively, you can use publish command, with syntax "--publish [host port]:[container port]". For example, this command, "$ docker run --publish 5000:5000 python-docker", will expose port 5000 inside the container to port 3000 outside the container,
EXPOSE 5000
# Use CMD to run the command that required to be executed inside a container.
# --host=0.0.0.0 ==> This make application externally visible from everythere in the Internet
CMD ["python3", "-m", "flask", "run", "--host=0.0.0.0"]
More about Dockerfile:
- Dockerfile Reference, https://docs.docker.com/engine/reference/builder/#syntax
- Best practices for writing Dockerfiles
Build an image based on Dockerfile defined previously:
After this point, you can close this file, and start to build the docker image.
$ docker build --tag python-docker .
-
docker buildcommand builds Docker images from a Dockerfile and a “context”. A build’s context is the set of files located in the specified PATH or URL. The Docker build process can access any of the files located in this context. --tag python-docker: The build command optionally takes a –tag flag. The tag is used to set the name of the image and an optional tag in the formatname:tag. We’ll leave off the optionaltagfor now to help simplify things. If you do not pass a tag, Docker uses “latest” as its default tag.- ` .`: This
Container Tag [Optional]
- Alias/Tags/Names
Just like Linux alias, an image can have multiple tag as well (It’s like a extra pointer/name for same image).
To create a alias tag, use the following command:
To create a new tag for the image we’ve built above, run the following command.
$ docker tag python-docker:latest python-docker:v1.0.0
# The docker tag command creates a new tag for an image. It does not create a new image. The tag points to the same image and is just another way to reference the image.
# Run the docker images command to see a list of our local images.
docker rmi [image_name]: Use to remove image.
For example:
# This will remove the image, or an alias tag if it has one
$ docker rmi python-docker:v1.0.0
Untagged: python-docker:v1.0.0
How to view local images:
Two way to do this: 1) CLI with command docker images; 2) Use Docker Desktop
How to run your image as a container?
$ docker run python-app
Run your image as a container
Overview
A container is a normal operating system process except that this process is isolated in that it has its own file system, its own networking, and its own isolated process tree separate from the host.
To run an image inside of a container, we use the docker run command. The docker run command requires one parameter which is the name of the image. Let’s start our image and make sure it is running correctly. Run the following command in your terminal.
$ docker run python-docker
You can try to open a new terminal, and use curl command to make a GET requests:
$ curl localhost:5000
# display all runing container on our machine
$ docker ps
CONTAINER ID   IMAGE               COMMAND                  CREATED      STATUS      PORTS
 NAMES
20b974b48881   docker101tutorial   "/docker-entrypoint.…"   2 days ago   Up 2 days   0.0.0.0:80->80/tcp, :::80->80/tcp   docker-tutorial

# Stop a running container
$ docker stop wonderful_kalam

# Display all container (both running and stop)
$ docker ps -a

# Restart a containers
$ docker restart wonderful_kalam

# Remove one container
$ docker rm wonderful_kalam

# Remove three containers at a time
$ docker rm wonderful_kalam agitated_moser goofy_khayyam

# Name a running container: Optional, but it is easier to identify what is running in the container and what application or service it is associated with.
$ docker run -d -p 5000:5000 --name rest-server python-docker
Use containers for Development
Overview
Introduction
In this module, we’ll walk through setting up a local development environment for the application we built in the previous modules. We’ll use Docker to build our images and Docker Compose to make everything a whole lot easier.
Run a database in a container
First, we’ll take a look at running a database in a container and how we use volumes and networking to persist our data and allow our application to talk with the database. Then we’ll pull everything together into a Compose file which allows us to setup and run a local development environment with one command. Finally, we’ll take a look at connecting a debugger to our application running inside a container.
Instead of downloading MySQL, installing, configuring, and then running the MySQL database as a service, we can use the Docker Official Image for MySQL and run it in a container.
Before we run MySQL in a container, we’ll create a couple of volumes that Docker can manage to store our persistent data and configuration. Let’s use the managed volumes feature that Docker provides instead of using bind mounts. You can read all about Using volumes in our documentation.
Let’s create our volumes now. We’ll create one for the data and one for configuration of MySQL.
Let’s create our volumes now. We’ll create one for the data and one for configuration of MySQL.
$ docker volume create mysql
$ docker volume create mysql_config
– Read more here, https://docs.docker.com/language/python/develop/
Deploy your app
Now, that we have configured a CI/CD pipleline, let’s look at how we can deploy the application. Docker supports deploying containers on Azure ACI and AWS ECS. You can also deploy your application to Kubernetes if you have enabled Kubernetes in Docker Desktop.
– Read more here, https://docs.docker.com/language/python/deploy/
Troubleshoot:
Problem Definition
curl localhost:5000
curl: (7) Failed to connect to localhost port 5000: Connection refused
As you can see, our curl command failed because the connection to our server was refused. This means, we were not able to connect to the localhost on port 5000. This is expected because our container is running in isolation which includes networking. Let’s stop the container and restart with port 5000 published on our local network.
Solution: 1) Add EXPOSE 5000 to Dockerfile; 2) try command $ docker run --publish 5000:5000 python-docker
# Expose the host's port 5000 for the application running in container, so the application can map its port to host port, so you can use "localhost:5000" to check the app.
# Alternatively, you can use publish command, with syntax "--publish [host port]:[container port]". For example, this command, "$ docker run --publish 5000:5000 python-docker", will expose port 5000 inside the container to port 3000 outside the container,
EXPOSE 5000
Common Docker commands
| Command | Explanation |
|---|---|
| docker –help | show all helping command and info |
| docker container logs [container_name] | show all building logs for container [container_name] |
| docker built -t [tag_name] | Build an image with tagname |
docker build -t <your-tag> -f Dockerfile . |
Build an image with -t tagname, and -f the dockerfile used to build image, in . current directory. |
-t portion means “tag” and you can add your own tag name I used hello-world since this might be your first time using Docker. When in doubt, include a tag. |
|
-f is the path to the Dockerfile you’re going to use to build your image. |
|
docker run -it <your-tag> |
This creates a “container” from your tagged image. In other words, a container is an instance of an image. |
-i: interactive mode |
|
-t Tag name is ? |
|
| docker run -it -p 8888:8888 hello_world | run a image with interactive mode, and port forward container port 8888 to localhost port 8888, e.g., [localhost_port]:[container_port] |
| docker run -d hello_world | run a image in background, so you need to type docker ps -a in order to see it |
| docker images | show all the docker images available in local machine |
| docker ps | list all the process running in your docker – 列出所有当前正在运行的容器 |
| docker ps -a | show all the containers being executed or ran – 列出所有之前运行过的容器。 |
| docker stop [container_id] | stop running |
| docker rm [container_id … ] | Remove one or more **containers ** (stop it, before remove – container only not image, and 可以一次性删除多个 |
| docker rm $(docker ps -a -q -f status=exited) | deletes all containers that have a status of exited. In case you’re wondering, the -q flag, only returns the numeric IDs and -f filters output based on conditions provided. |
docker image rm [tag_name] --force |
Remove container with all alias tag |
| docker image tag react-docker |
Provide an new tagname called <your-username>/react-docker with 1.0 version, for container react-docker |
docker rmi [image_id] |
remove the docker images |
docker rm $(docker ps -a -q) + docker rmi $(docker images -q) |
Pro tip, to remove all of these images just run docker rm $(docker ps -a -q) then docker rmi $(docker images -q) |
| docker create | create your own container |
| docker pull | get from docker hub |
| docker push | push to docker hub |
docker image rm d2d0a95aa16ce0711013e07666301b34c2f1f144c9d7061487edaf87f1acbfac --force
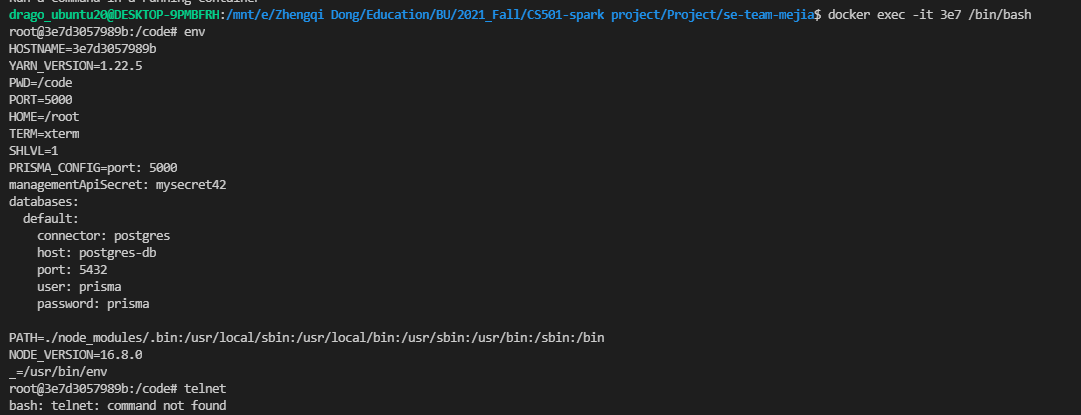
Open specific running container’s in a bash shell
docker ps
docker exec -it 3e7 /bin/bash


| $ ps -Af | grep -i docker ==> show docker process in linux |

Other Good Resources:
-
Docker Cheat Sheet, https://github.com/wsargent/docker-cheat-sheet
-
Integration with WSL2
- Docker Desktop WSL 2 backend
Container Management Commands
Status
- show a list of running containers :
$ docker psor$ docker container ls - show a list of all containers :
$ docker ps -aor$ docker ps --allor$ docker container ls -a
Create
- create a new container from an image :
$ docker create IMAGE
Start
- start a container after create :
$ docker start -a ID - start a stopped container :
$ docker start ContainerIDor$ docker start ContainerName
Run
- start a new container from an image :
$ docker run Image - start a new container from an image and change default commands :
$ docker run Image Commands - start a new container from an image and assign it a name :
$ docker run --name Name Image - start a new container from an image and run in the background :
$ docker run -d Image - start a new container from an image and map all ports :
$ docker run -p HostPort:DockerPort Image - start a new container from an image and removes a container after it exits :
$ docker run --rm Image
Pause / Unpause / Wait
- suspends all processes in the specified containers :
$ docker pause ContainerIDor$ docker pause ContainerName - un-suspends all processes in the specified containers :
$ docker unpause ContainerIDor$ docker unpause ContainerName - block until one or more containers stop and then print their exit codes :
$ docker wait ContainerIDor$ docker wait ContainerName
Stop / Kill
- stop a running container :
$ docker stop ContainerIDor$ docker stop ContainerName - kill a running container :
$ docker kill ContainerIDor$ docker stop ContainerName
Restart
- restart a container :
$ docker restart ContainerIDordocker start ContainerName
Delete
- delete a container :
$ docker rm ContainerIDordocker rm ContainerName - delete a running container :
$ docker rm -f ContainerIDordocker rm -f ContainerName - delete stopped containers :
$ docker container prune
Rename
- rename a container :
$ docker rename ContainerName NewContainerName
Update
- update the configuration of one or more containers :
$ docker update ContainerName
Attach
- attach local standard input, output, and error streams to a running container :
$ docker attach ContainerIDor$ docker attach ContainerName
Information
- show the container output (stdout & stderror) :
$ docker logs ContainerIDor$ docker logs ContainerName - show low level information on the container :
$ docker inspect ContainerIDor$ docker inspect ContainerName - list the process running inside the container :
$ docker top ContainerIDor$ docker top ContainerName - to get real-time events from the server :
$ docker events - list port mappings or a specific mapping for the container :
$ docker port ContainerIDor$ docker port ContainerName - display a live stream of container(s) resource usage statistics :
$ docker stats - inspect changes to files or directories on a container’s filesystem :
$ docker diff ContainerIDor$ docker diff ContainerName
CS501 Prisma Project Specific:
Backend Deployment
Enabling HTTPS on your website:
To enable HTTPS on your website, you need to get a certificate (a type of file) from a Certificate Authority (CA). Let’s Encrypt is a free CA. In order to get a certificate for your website’s domain from Let’s Encrypt, you have to demonstrate control over the domain. With Let’s Encrypt, you do this using software that uses the ACME protocol. The Automatic Certificate Management Environment protocol(ACME) is a communications protocol for automating interactions between certificate authorities and their users’ web servers, allowing the automated deployment of public key infrastructure at very low cost.
Step 1: Have some understanding about HTTPS, CA, and SSL
Step 2: Understand what is Let’s Encrypt
Step 3: Follow instruction here to install certbot to your backend server, ubuntu 20.04
-
SSH into the server
SSH into the server running your HTTP website as a user with sudo privileges.
-
Install snapd (Skip for Ubuntu 20.04)
You’ll need to install snapd and make sure you follow any instructions to enable classic snap support.
Follow these instructions on snapcraft’s site to install snapd.
-
Ensure that your version of snapd is up to date
Execute the following instructions on the command line on the machine to ensure that you have the latest version of
snapd.sudo snap install core; sudo snap refresh core -
Remove certbot-auto and any Certbot OS packages
If you have any Certbot packages installed using an OS package manager like
apt,dnf, oryum, you should remove them before installing the Certbot snap to ensure that when you run the commandcertbotthe snap is used rather than the installation from your OS package manager. The exact command to do this depends on your OS, but common examples aresudo apt-get remove certbot,sudo dnf remove certbot, orsudo yum remove certbot. If you previously used Certbot through the certbot-auto script, you should also remove its installation by following the instructions here. -
Install Certbot
Run this command on the command line on the machine to install Certbot.
sudo snap install --classic certbot -d mejia.ml
# mejia.ml is you domain name
Note:
Also, making your to set your domain name pointing to your server IP address, like the following:

DNS TTL (time to live) is a setting that tells the DNS resolver how long to cache a query before requesting a new one…. ==> 600 is 10min, so should be enough
Note 2: Here is a log for the command that I run throught:
$ sudo snap install core; sudo snap refresh core
core 16-2.52.1 from Canonical✓ installed
snap "core" has no updates available
$ sudo snap install --classic certbot
Mount snap "certbot" (1582) \error: change finished in status "Undone" with no error message

$ sudo ln -s /snap/bin/certbot /usr/bin/certbot
$ sudo certbot certonly --standalone
sudo: certbot: command not found
$ snap changes
ID   Status  Spawn               Ready               Summary
6    Done    today at 22:41 UTC  today at 22:43 UTC  Install "core" snap
7    Undone  today at 22:43 UTC  today at 22:44 UTC  Install "certbot" snap
$ snap change 7
Status  Spawn               Ready               Summary
Done    today at 22:43 UTC  today at 22:44 UTC  Ensure prerequisites for "certbot" are available
Undone  today at 22:43 UTC  today at 22:44 UTC  Download snap "certbot" (1582) from channel "stable"
Done    today at 22:43 UTC  today at 22:44 UTC  Fetch and check assertions for snap "certbot" (1582)
Undone  today at 22:43 UTC  today at 22:44 UTC  Mount snap "certbot" (1582)
Hold    today at 22:43 UTC  today at 22:44 UTC  Copy snap "certbot" data
Hold    today at 22:43 UTC  today at 22:44 UTC  Setup snap "certbot" (1582) security profiles
Hold    today at 22:43 UTC  today at 22:44 UTC  Make snap "certbot" (1582) available to the system
Hold    today at 22:43 UTC  today at 22:44 UTC  Automatically connect eligible plugs and slots of snap "certbot"
Hold    today at 22:43 UTC  today at 22:44 UTC  Set automatic aliases for snap "certbot"
Hold    today at 22:43 UTC  today at 22:44 UTC  Setup snap "certbot" aliases
Hold    today at 22:43 UTC  today at 22:44 UTC  Run install hook of "certbot" snap if present
Hold    today at 22:43 UTC  today at 22:44 UTC  Start snap "certbot" (1582) services
Hold    today at 22:43 UTC  today at 22:44 UTC  Run configure hook of "certbot" snap if present
Hold    today at 22:43 UTC  today at 22:44 UTC  Run health check of "certbot" snap

## ==> If you see something like this after installation, just reinstall again, and it will work magically


$ sudo snap install --classic certbot
certbot 1.21.0 from Certbot Project (certbot-eff✓) installed
-
Prepare the Certbot command
Execute the following instruction on the command line on the machine to ensure that the
certbotcommand can be run.sudo ln -s /snap/bin/certbot /usr/bin/certbot -
Choose how you’d like to run Certbot
Are you ok with temporarily stopping your website?
Yes, my web server is not currently running on this machine.
Stop your webserver, then run this command to get a certificate. Certbot will temporarily spin up a webserver on your machine.
sudo certbot certonly --standalone
Note:
$ sudo certbot certonly --standalone
Saving debug log to /var/log/letsencrypt/letsencrypt.log
Enter email address (used for urgent renewal and security notices)
 (Enter 'c' to cancel): dong760@bu.edu

- - - - - - - - - - - - - - - - - - - - - - - - - - - - - - - - - - - - - - - -
Please read the Terms of Service at
https://letsencrypt.org/documents/LE-SA-v1.2-November-15-2017.pdf. You must
agree in order to register with the ACME server. Do you agree?
- - - - - - - - - - - - - - - - - - - - - - - - - - - - - - - - - - - - - - - -
(Y)es/(N)o: Yes

- - - - - - - - - - - - - - - - - - - - - - - - - - - - - - - - - - - - - - - -
Would you be willing, once your first certificate is successfully issued, to
share your email address with the Electronic Frontier Foundation, a founding
partner of the Let's Encrypt project and the non-profit organization that
develops Certbot? We'd like to send you email about our work encrypting the web,
EFF news, campaigns, and ways to support digital freedom.
- - - - - - - - - - - - - - - - - - - - - - - - - - - - - - - - - - - - - - - -
(Y)es/(N)o: Yes
Account registered.
Please enter the domain name(s) you would like on your certificate (comma and/or
space separated) (Enter 'c' to cancel): mejia.ml
Requesting a certificate for mejia.ml

Certbot failed to authenticate some domains (authenticator: standalone). The Certificate Authority reported these problems:
  Domain: mejia.ml
  Type:   dns
  Detail: No valid IP addresses found for mejia.ml

Hint: The Certificate Authority failed to download the challenge files from the temporary standalone webserver started by Certbot on port 80. Ensure that the listed domains point to this machine and that it can accept inbound connections from the internet.

Some challenges have failed.
Ask for help or search for solutions at https://community.letsencrypt.org. See the logfile /var/log/letsencrypt/letsencrypt.log or re-run Certbot with -v for more details.

$ sudo certbot certonly --standalone -d mejia.ml
Saving debug log to /var/log/letsencrypt/letsencrypt.log
Requesting a certificate for mejia.ml

Successfully received certificate.
Certificate is saved at: /etc/letsencrypt/live/mejia.ml/fullchain.pem
Key is saved at:         /etc/letsencrypt/live/mejia.ml/privkey.pem
This certificate expires on 2022-03-02.
These files will be updated when the certificate renews.
Certbot has set up a scheduled task to automatically renew this certificate in the background.

- - - - - - - - - - - - - - - - - - - - - - - - - - - - - - - - - - - - - - - -
If you like Certbot, please consider supporting our work by:
 * Donating to ISRG / Let's Encrypt:   https://letsencrypt.org/donate
 * Donating to EFF:                    https://eff.org/donate-le
- - - - - - - - - - - - - - - - - - - - - - - - - - - - - - - - - - - - - - - -

# ==> If you see this in the terminal. Congraduation, that means you have CA registered sucessfully!
- Install your certificate
You’ll need to install your new certificate in the configuration file for your webserver.
- Test automatic renewal
The Certbot packages on your system come with a cron job or systemd timer that will renew your certificates automatically before they expire. You will not need to run Certbot again, unless you change your configuration. You can test automatic renewal for your certificates by running this command:
sudo certbot renew --dry-run
The command to renew certbot is installed in one of the following locations:
/etc/crontab//etc/cron.*/*systemctl list-timers
- Confirm that Certbot worked
To confirm that your site is set up properly, visit https://yourwebsite.com/ in your browser and look for the lock icon in the URL bar.
Reference:
- Run postgres database in docker container, https://egghead.io/lessons/egghead-run-postgres-database-in-docker-container
-
Dockerizing a NestJS app with Prisma and PostgreSQL, https://notiz.dev/blog/dockerizing-nestjs-with-prisma-and-postgresql
- Docker official documents:
- dockersamples/example-voting-app, https://github.com/dockersamples/example-voting-app/tree/master/vote
- Overview of docker-compose CLI, https://docs.docker.com/compose/reference/
Common workflows
The Docker CLI and Docker Compose CLI are used to manage the Prisma servers.
Here’s a quick rundown of the most important commands:
- docker-compose build: build or rebuild the container
docker-compose up -d: Start a new Prisma server to which you can deploy your Prisma services.docker-compose stop: Stops the Prisma server.docker-compose pull: Downloads the latest Prisma images from Docker Hub-
docker logs: Shows the logs of the Prisma server (helpful for debugging). - docker-compose down -v: To destroy the cluster and the data volumes
- docker container ls
Docker .yaml File Structure
This .yaml file has 3 top-level keys:
- version — the version number of the Docker Compose file, which corresponds to different capabilities offered by different versions of the Docker Engine
- services — each service corresponds to a separate Docker container that is created using a separate Docker image
- volumes — named volumes that are mounted and can be shared amongst your Docker containers (but not your host computer), for storing persistent data
docker-compose.yml Reference
BUILD
When you’re creating a Docker container, you can either base it on an existing image (either a local image or one pulled down from DockerHub.com), or you can build it locally via a Dockerfile.
As mentioned above, I chose the methodology that each service would be creating as a build from a Dockerfile (all of which extend FROM an image up on DockerHub.com) to keep things consistent.
This means that some of our Dockerfiles we use are nothing more than a single line, e.g.: FROM mariadb:10.3, but this setup does allow for expansion.
The two keys used for build are:
- context — this specifies where the working directory for the build should be, relative to the docker-compose.yaml file. This is set to the root directory of each service
- dockerfile — this specifies a path to the Dockerfile to use to build the service Docker container. Think of the Dockerfile as a local Docker image
So the context is always the root directory of each service, with the Dockerfile and any supporting files for each service are off in a separate directory. We do it this way so that we’re not passing down more than is needed when building the Docker images, which slows down the build process significantly (thanks to Mizux Seiha & Patrick Harrington for pointing this out!).
ENV_FILE
The env_file setting specifies a path to your .env file for key/value pairs that will be injected into a Docker container.
Docker does not allow for quotes in its .env file, which is contrary to how .env files work almost everywhere else… so remove any quotes you have in your .env file.
You’ll notice that for the nginx service, there’s a strange &env value in the env_file setting, and for the other services, the setting is *env. This is taking advantage of YAML aliases, so if w
INIT
Setting init: true for an image causes signals to be forwarded to the process, which allows them to terminate quickly when you halt them with Control-C.
DEPENDS_ON
This just lets you specify what other services this particular service depends on; this allows you to ensure that other containers are up and running before this container starts up.
Extra Note:
- Docker does not allow for quotes in its .env file, which is contrary to how .env files work almost everywhere else… so remove any quotes you have in your .env file.
Reference:
- An Annotated Docker Config for Frontend Web Development, https://nystudio107.com/blog/an-annotated-docker-config-for-frontend-web-development
- Dockerizing a NestJS app with Prisma and PostgreSQL, https://notiz.dev/blog/dockerizing-nestjs-with-prisma-and-postgresql
- Connect prisma to PostgreSQL database running in docker container, https://egghead.io/lessons/egghead-connect-prisma-to-postgresql-database-running-in-docker-container
Configure CI/CD
Figure1: DevOps Tools Ecosystem:
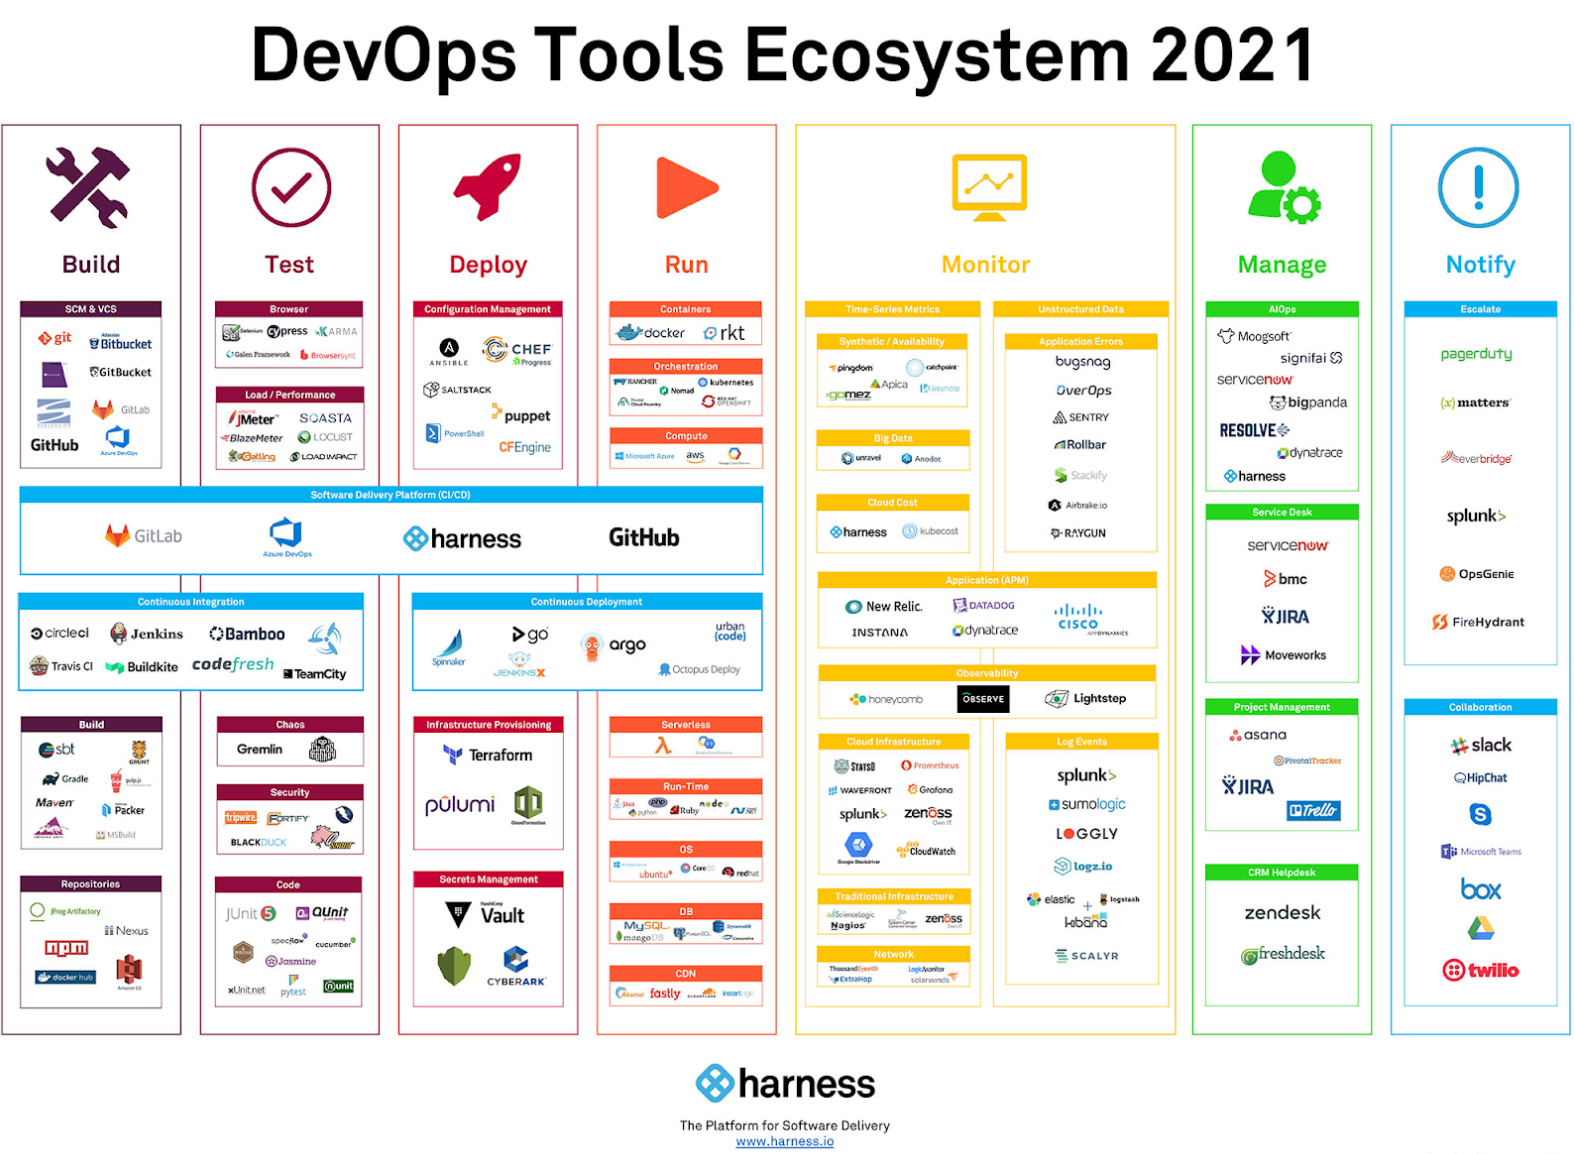
Figure2: CI/CD Tool chain, https://www.suntechnologies.com/wp-content/uploads/2021/02/tools.png
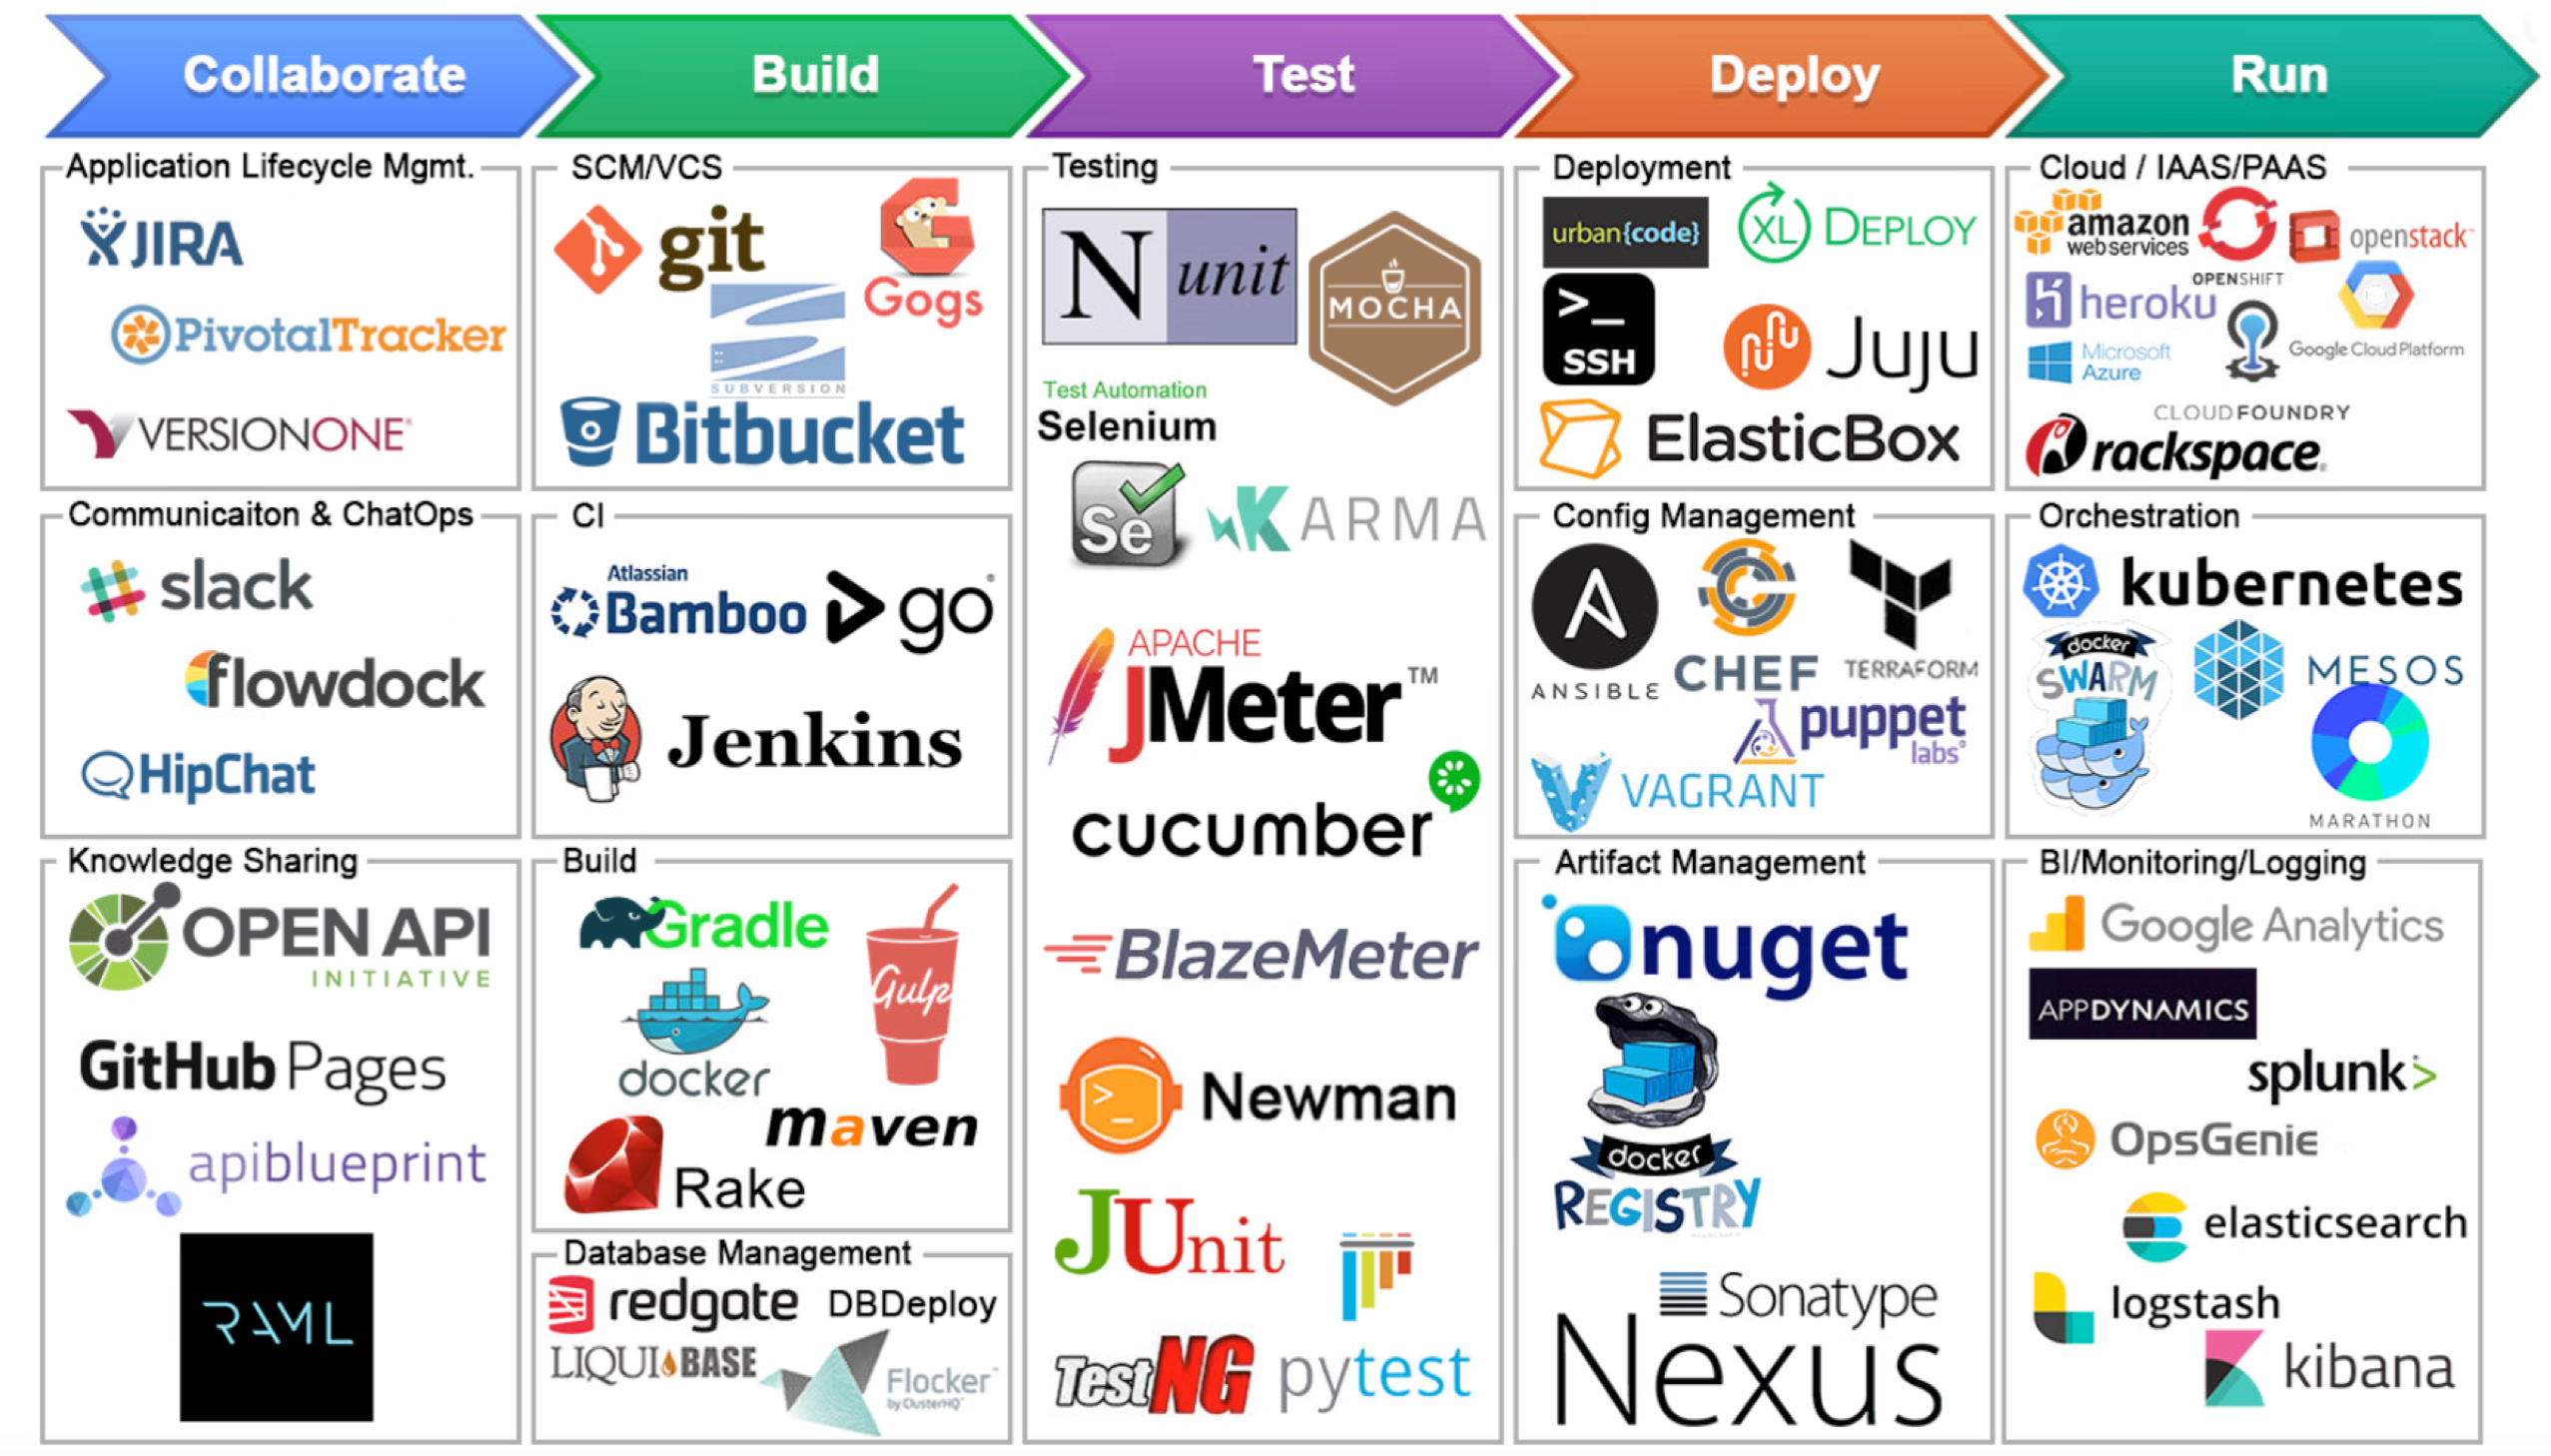
Figure3: Continuous Integration + Continuous Delivery Vs Continuous Deployment
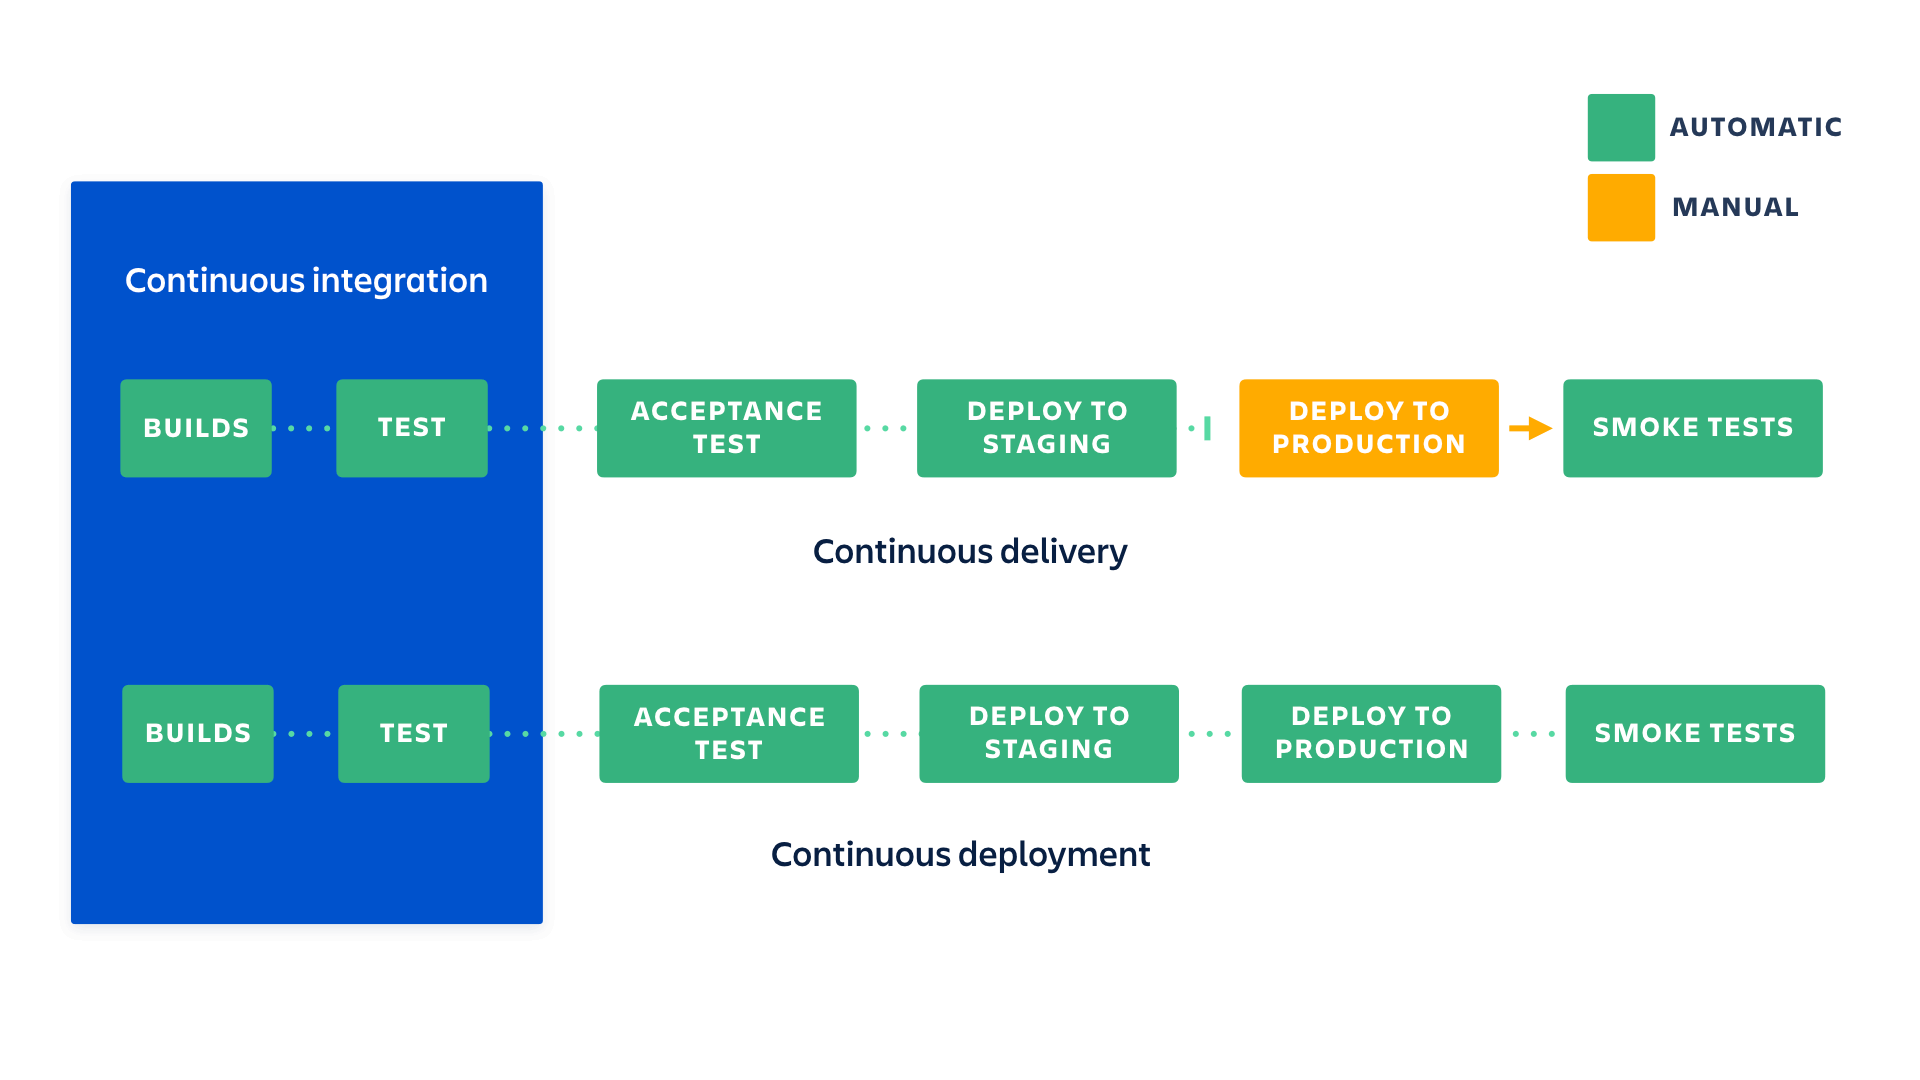
Continous Integration(CI): So CI stands for continuous integration. Basically, it’s composed of build and test two step. The build and test should run in the same environment every single time. And, this process should be done in a consistent and repeatable environment. The build and test is an indication of whether your code is gonna work in production, and this will result you to have an artifact or failed test feedback at all times. If the build and test is sucessful, you’ll have an artifact ready for deployment, if you don’t have an artifact for deployment, then there is a failure, and you should have a closed feedback loop that tell you where it failed, so you can go to the code and fix it, and trigger another CI cycle for a new deployment.
Continuous Delivery(CD): CD can refers to Continuous delivery or continuous deployment. For Continuous delivery, it's an extension of CI, which allows an automated released or deployment process after the integration process. Continuous deployment goes one step further than continuous delivery. It provides fully automation pipeline from build to test, to deployment in production, there is no human intervention, and only a failed test will prevent a new change to be deployed to production.
Continuous Deployment(CD): Continuous deployment is an excellent way to accelerate the feedback loop with your customers and take pressure off the team as there isn’t a Release Day anymore. Developers can focus on building software, and they see their work go live minutes after they’ve finished working on it
And overall with the CI/CD pipeline, we increased the lead time, the time taken from source to deployment, and that means the organization can be more responsive based on customer’s request, and deliver to customer fater. Also, for the development team, the failure rate can be reduced as the development team can get feedbacks more often than in the past.
- Q: What is difference between Continous Delivery and Continuous Deployment?
They are quite similar, Continous delivery just requires some extra manually step you need to perfrom, as a gateway before you go to the production. So you need somebody to approve and make sure that the changes that are about to be deployed are in fact what you want.
Best Practice
This page guides you through the process of setting up a GitHub Action CI/CD pipeline with Docker containers. Before setting up a new pipeline, we recommend that you take a look at Ben’s blog on CI/CD best practices .
This guide contains instructions on how to:
- Use a sample Docker project as an example to configure GitHub Actions
- Set up the GitHub Actions workflow
- Optimize your workflow to reduce the number of pull requests and the total build time, and finally,
- Push only specific versions to Docker Hub.
– Read more here, https://docs.docker.com/language/python/configure-ci-cd/
Reference:
-
Best 14 CI/CD Tools You Must Know Updated for 2021, https://www.katalon.com/resources-center/blog/ci-cd-tools/ - Best practices for using Docker Hub for CI/CD, https://www.docker.com/blog/best-practices-for-using-docker-hub-for-ci-cd/
