In this project, we will use a temperature sensor to measure the temperature of a person’s skin. The warmer your skin the more LED light indicator will be turn on. At the end, we will learn how TMP36 termperature sensor is used to reading off the degree from voltage.
Lab Setup:
- 1 x Arduino UNO
- 1 x Breadboard
- 8 x Jumper wires
- 3 x 220-ohm resistors
- 1 x Temperature sensor
- 3 x LEDs
DESIGN THE CIRCUIT:
Schematic view:

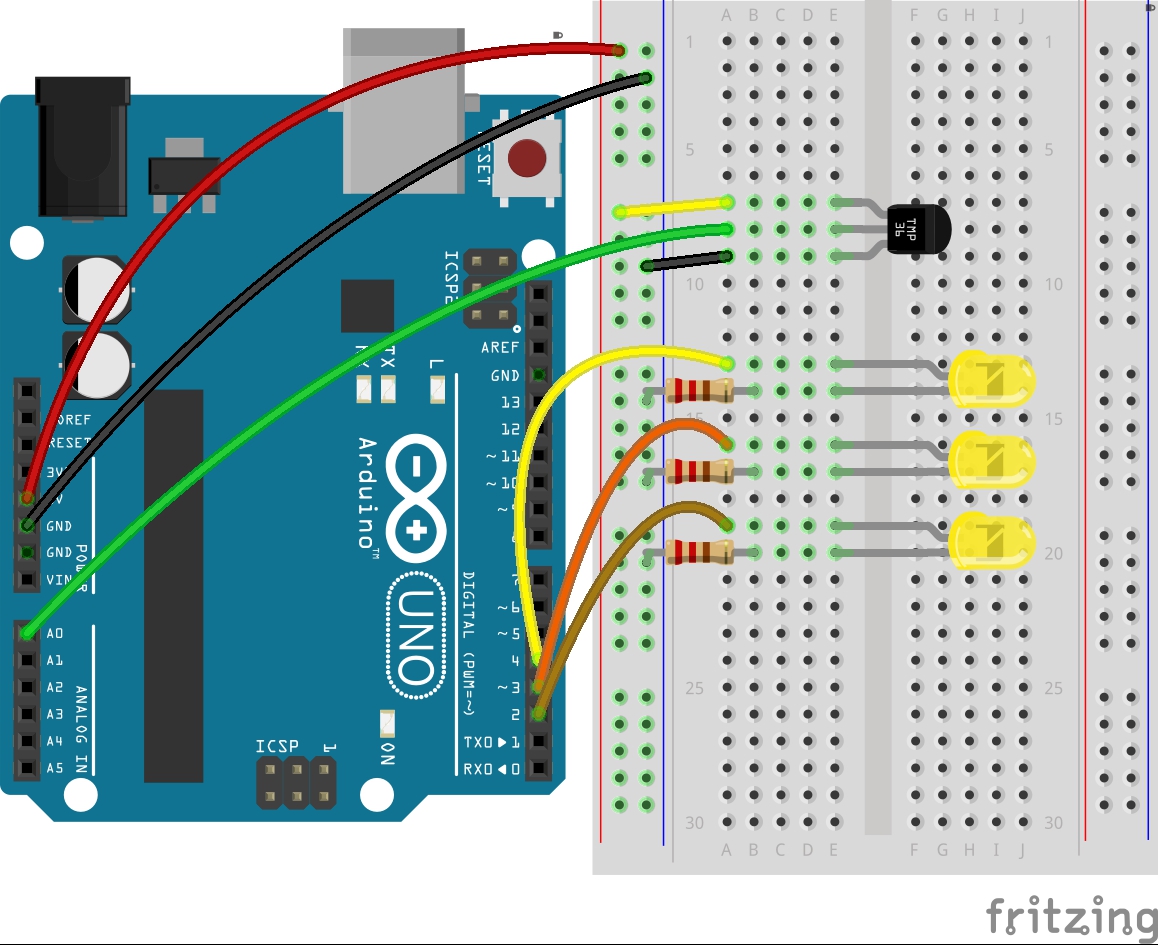
Circuit diagrame from Fritzing:
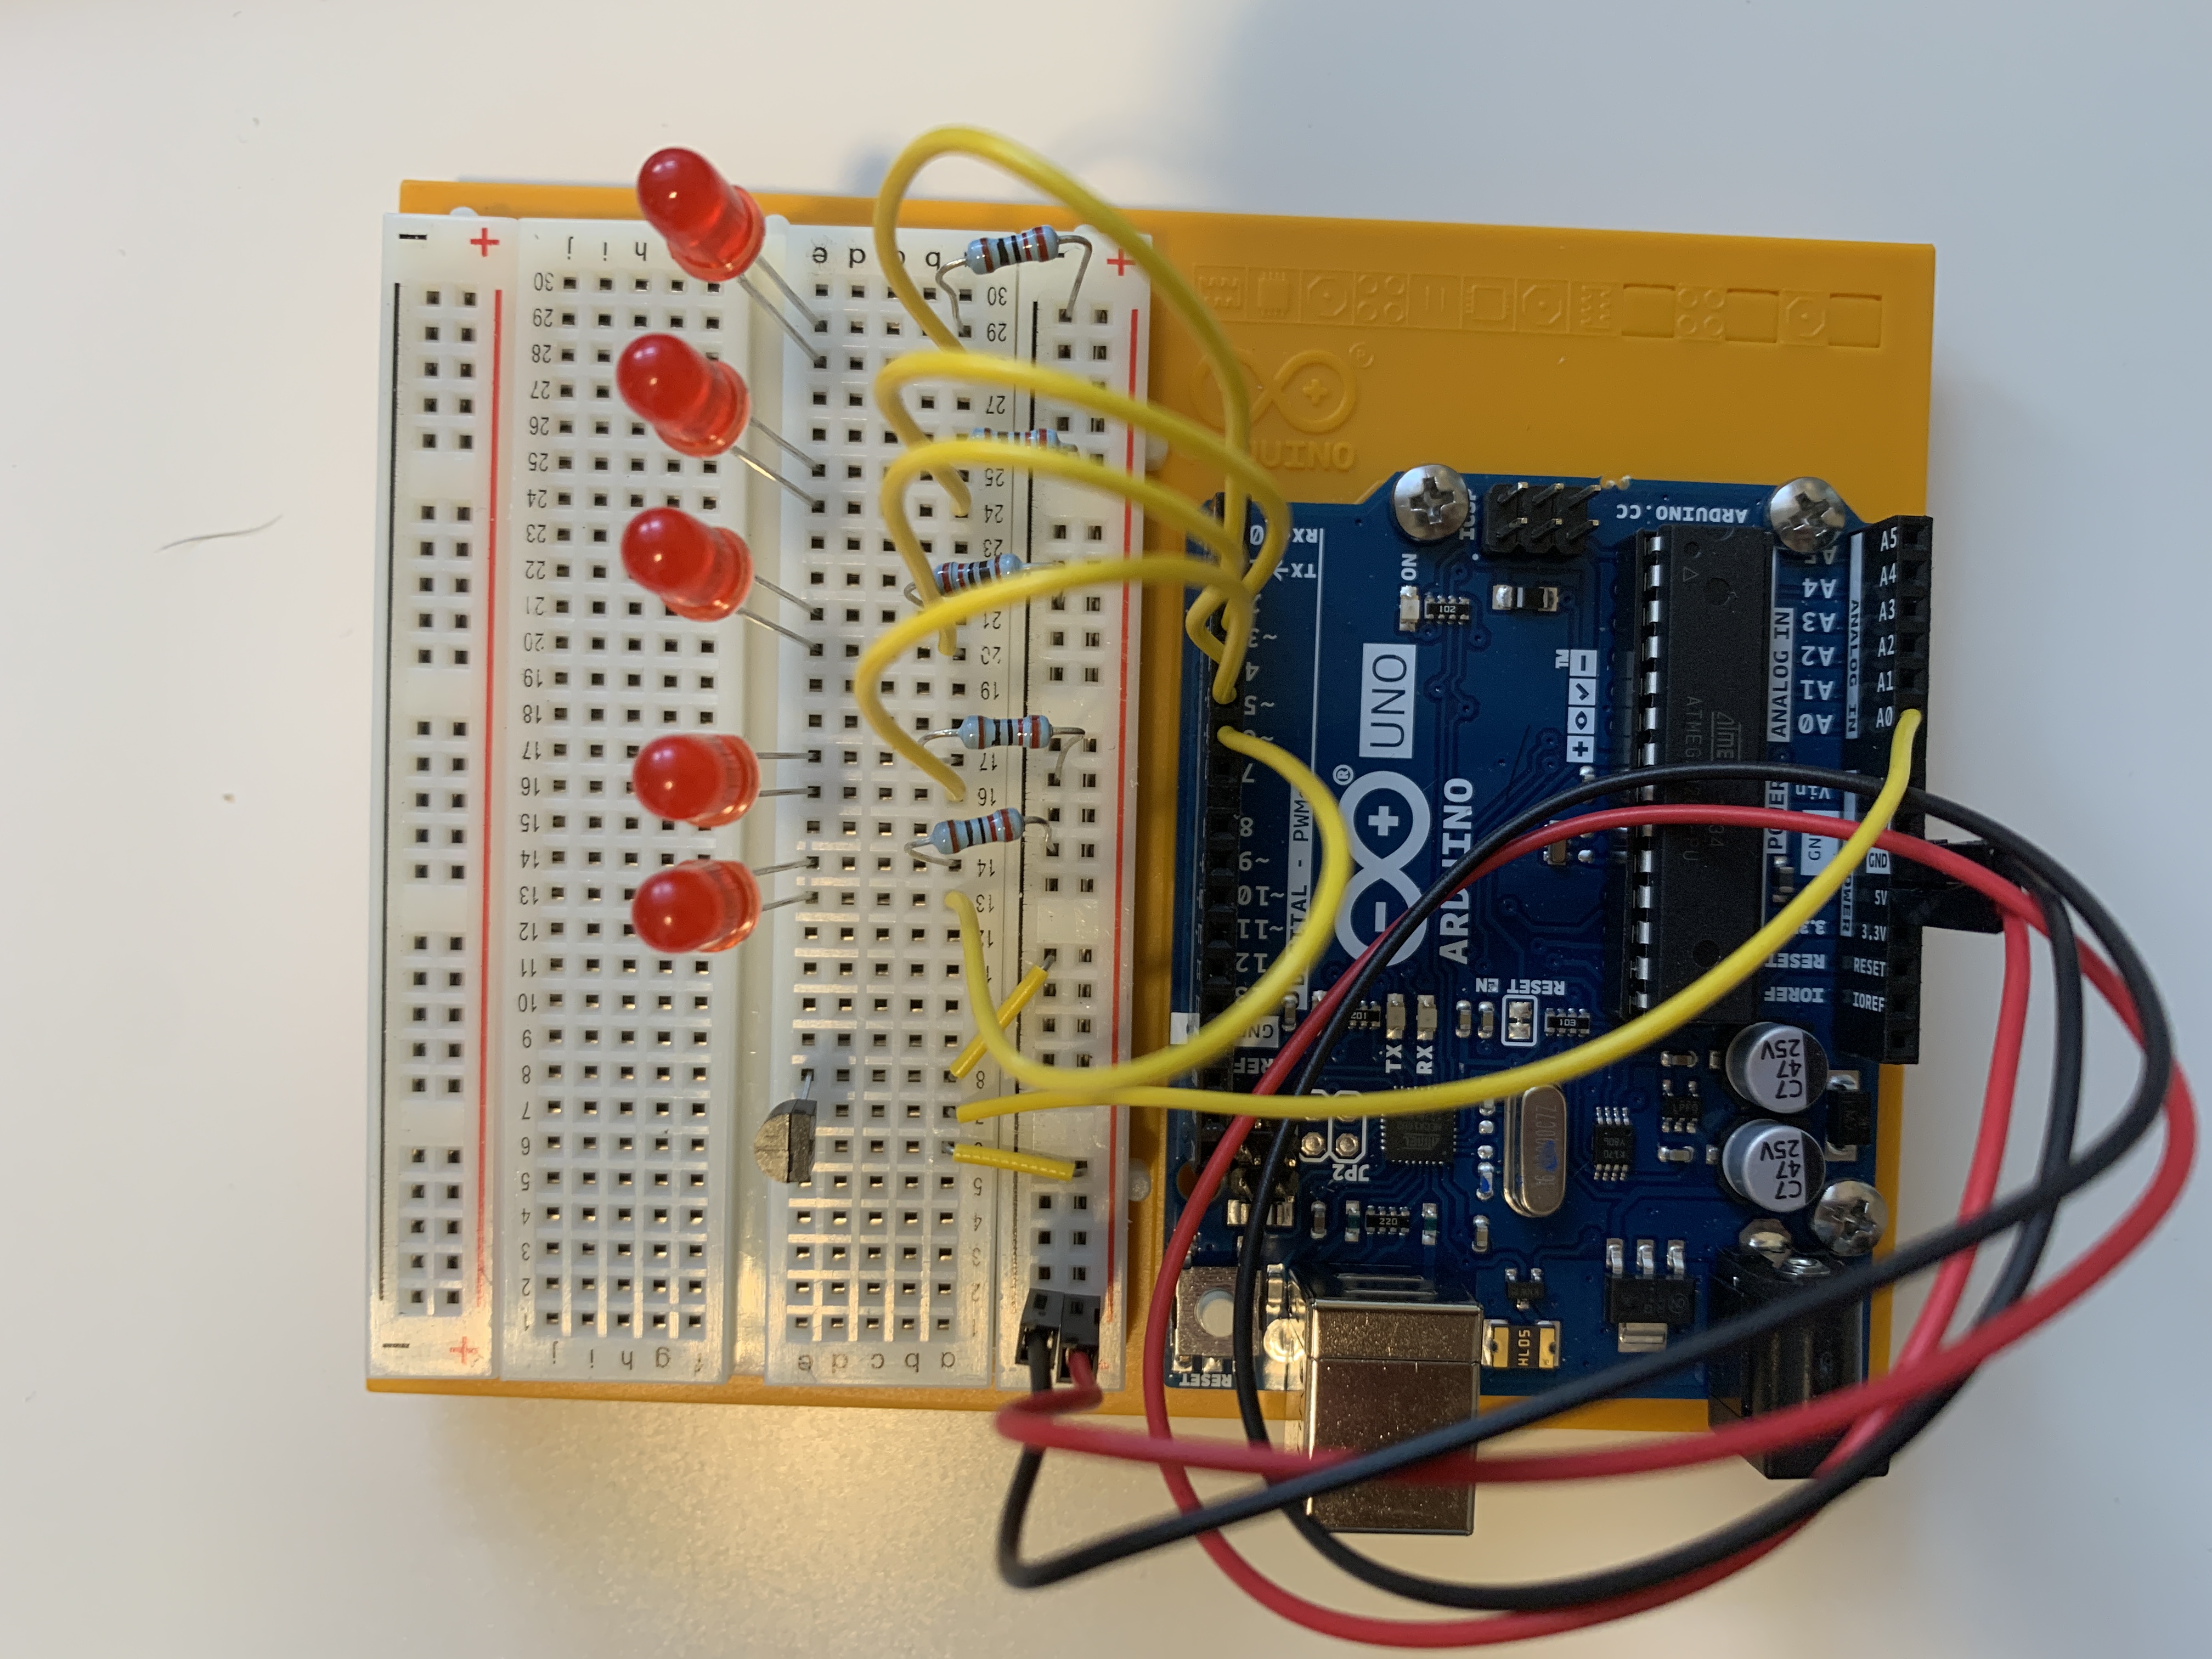
The actually setup:
THE CODE:
Serial.begin(baud_rate);
This function opens a connection between the Arduino and the computer with a defined speed, baud_rate, e.g. Serial.begin(9600) says the Arduino and your PC’s will communite in 9600 bits per second. (Verify this in the IDE’s serial monitor)
analogRead(pin);
Similarly to digitalRead(pin), analogRead(pin) will get the value from the particular pin number (from A0 to A5), and it indicates the voltage of that pin, which varies between 0 and 1023.
Serial.print(variable);
It sends the information from Arduino to your PC, which can be view from the serial monitor.(Serial monitor locate at upper right conner of IDE, or use shortcut Ctrl + Shift + M)
Here are the formulas that I used for this lab, which describe the relationship between the sensor and the voltage:
float voltage = (sensorValue / 1024.0) * 5.0;
Voltage is assigned a real value between 0V and 5V. Since the sensor will read a value between 0 and 1024, we need to divide it by 1024 to get the ratio (or how much of 1024 the sensor reads in) and then multiply by 5 to get how much of 5V the voltage is going to have.
temperature = (voltage - 0.5) * 100.0;
For this TMP36 temperature sensor, every 10mV equals 1 degree Celsius.
Here is the code that I used(I modified from original code to have 5 LED. Each degree increase in your skin temperature, one more LED will be turn on. It has more precise indication to measure your skin temerature, which usually range from 32–35 °C, https://hypertextbook.com/facts/2001/AbantyFarzana.shtml)
1
2
3
4
5
6
7
8
9
10
11
12
13
14
15
16
17
18
19
20
21
22
23
24
25
26
27
28
29
30
31
32
33
34
35
36
37
38
39
40
41
42
43
44
45
46
47
48
49
50
51
52
53
54
55
56
57
58
59
60
61
62
63
64
65
66
67
68
69
70
71
72
73
74
75
76
77
/**
 * Project Name: Arduino Projects Book - Project 03: Love-O-Meter
 *
 * File Name: Project3_Love-o-Meter.ino
 * Description:
 * Author: Zhengqi Dong
 * Created:
 * Updated:
 */

const int sensorPin = A0;
const float baselineTemp = 32.0;

void setup() {
  Serial.begin(9600);
  int pinNumber;
  for(pinNumber = 2; pinNumber < 7; pinNumber++){
    pinMode(pinNumber, OUTPUT);
    digitalWrite(pinNumber, LOW);
  }
}

void loop() {
  // put your main code here, to run repeatedly:
  int sensorVal = analogRead(sensorPin);
  Serial.print("Sensor Value: ");
  Serial.print(sensorVal);

  // convert the ADC reading to voltage
  float voltage = (sensorVal/1024.0) * 5.0;
  Serial.print(", Volts: ");
  Serial.print(voltage);

  //convert the voltage to temperature in degrees
  Serial.print(", degress C: ");
  float temperature = (voltage - 0.5) * 100;
  Serial.println(temperature);

  //Control how the LED will change with different temperature
  if(temperature < baselineTemp){
    digitalWrite(2, LOW);
    digitalWrite(3, LOW);
    digitalWrite(4, LOW);
    digitalWrite(5, LOW);
    digitalWrite(6, LOW);
  }else if(temperature >= baselineTemp+1 && temperature <= baselineTemp+2){
    digitalWrite(2, HIGH);
    digitalWrite(3, LOW);
    digitalWrite(4, LOW);
    digitalWrite(5, LOW);
    digitalWrite(6, LOW);
  }else if(temperature >= baselineTemp+2 && temperature <= baselineTemp+3){
    digitalWrite(2, HIGH);
    digitalWrite(3, HIGH);
    digitalWrite(4, LOW);
    digitalWrite(5, LOW);
    digitalWrite(6, LOW);
  }else if(temperature >= baselineTemp+3 && temperature <= baselineTemp+4){
    digitalWrite(2, HIGH);
    digitalWrite(3, HIGH);
    digitalWrite(4, HIGH);
    digitalWrite(5, LOW);
    digitalWrite(6, LOW);
  }else if(temperature >= baselineTemp+4 && temperature <= baselineTemp+5){
    digitalWrite(2, HIGH);
    digitalWrite(3, HIGH);
    digitalWrite(4, HIGH);
    digitalWrite(5, HIGH);
    digitalWrite(6, LOW);
  }else if(temperature >= baselineTemp+5 && temperature <= baselineTemp+6){
    digitalWrite(2, HIGH);
    digitalWrite(3, HIGH);
    digitalWrite(4, HIGH);
    digitalWrite(5, HIGH);
    digitalWrite(6, HIGH);
  }
}
Video Explanation:
Here is more detailed explanation of those electronic componenet that I used in this lab:
Reference:
Fitzgerald, S., & Shiloh, M. Arduino Projects Book. Arduino AG, 2017
