Table of contents
Lab 2 Overview
Building an Electro-Pneumatic Control Circuit 建立一种电-气控制电路
-
Fabrication 组装,装配
-
Fabricat pneumatic actuator out of either heat weldable fabric(热焊结构) or a plastic bag (do this first so the adhesive has time to set) 制造气动执行机构的可焊织物热(热焊结构)或一个塑料袋(这样做首先胶时间设置)
-
Solder leads onto your mini-pump
-
Assemble pneumatic tubing and electro-mechanical system
-
Assemble circuit on breadboard and combine with pneumatic system
-
Upload provided code and run
-
Lab 2 Component List
-
Mini-pump x1
- Solenoid valve x2
- Additional small diameter tubing
- Power supply wall adapter x1
- Breadboard power supply module x1
- Transistor x3
- Diode x3
- Heat weldable fabric OR plastic bag
-
Communal tools:
- Fabric adhesive
- Soldering irons
- Impulse sealers
- Hand pumps
Wiring Diagram 接线图;布线图
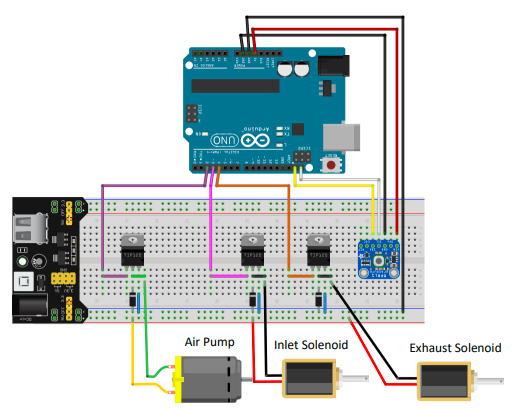
Note: Make sure the power supply module is plugged in and turned on
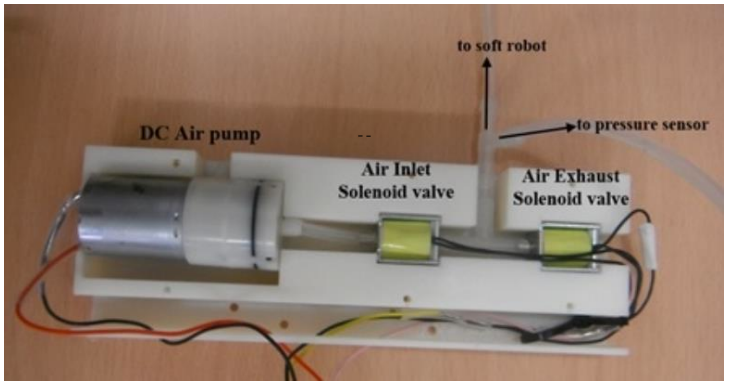
Pneumatic System Setup 气动系统设置
Notes:
- Soft Robot” in the diagram will refer to the soft actuator in our lab
- Additional changes betweensmall and large diameter tubing will be needed to fit components and T-connectors
Coding
- Sample code to run system is available on Blackboard
- A text file containing the code has also been uploaded in case there are issues with downloading the Arduino file
- You may need to change the pump/exhaust times in the code to match the capacity of your actuator
#include <Wire.h>
#include <Adafruit_MPRLS.h>

#define RESET_PIN  -1  // set to any GPIO pin # to hard-reset on begin()
#define EOC_PIN    -1  // set to any GPIO pin to read end-of-conversion by pin
Adafruit_MPRLS mpr = Adafruit_MPRLS(RESET_PIN, EOC_PIN);

int pumpPin = 2;
int solenoidInlet = 3;
int solenoidExhaust = 4;

void setup() {
  Serial.begin(115200);
  Serial.println("MPRLS Simple Test");
  if (! mpr.begin()) {
    Serial.println("Failed to communicate with MPRLS sensor, check wiring?");
    while (1) {
      delay(10);
    }
  }
  Serial.println("Found MPRLS sensor");

  pinMode(pumpPin, OUTPUT);
  pinMode(solenoidInlet,OUTPUT);
  pinMode(solenoidExhaust,OUTPUT);

  digitalWrite(solenoidInlet, HIGH);
  digitalWrite(solenoidExhaust, LOW);
  digitalWrite(pumpPin, HIGH);
  delay(4000);
  digitalWrite(pumpPin, LOW);
  delay(1000);
}

void loop() {
  float pressure_hPa = mpr.readPressure();
  Serial.print("Pressure (hPa): "); Serial.println(pressure_hPa);
  Serial.print("Pressure (PSI): "); Serial.println(pressure_hPa / 68.947572932);
  delay(5000);
  digitalWrite(solenoidExhaust, HIGH);
}
Lab 2 Walkthrough Video:
Lab 2 Report Demo:
Reference:
- Soft Robotic Toolkit: Based on electro-pneumatic system from Soft Robotic Toolkit, https://softroboticstoolkit.com/low-cost-ep-circuit
